Note
As POX is continually evolving, things on this page may not always reflect exactly the state of any particular branch in the POX code repository. If you’re using an old branch, you may find it helpful to view a version of this page from the past (e.g. around the time your branch was current). If you’re using the newest branch and things written here aren’t right, feel free to fix them or mention it on the mailing list or forum.
Table of Contents
- Installing POX
- Invoking POX
- Components in POX
- Stock Components
- py
- forwarding.hub
- forwarding.l2_learning
- forwarding.l2_pairs
- forwarding.l3_learning
- forwarding.l2_multi
- forwarding.l2_nx
- forwarding.topo_proactive
- openflow.spanning_tree
- openflow.webservice
- web.webcore
- messenger
- openflow.of_01
- openflow.discovery
- openflow.debug
- openflow.keepalive
- proto.pong
- proto.arp_responder
- info.packet_dump
- proto.dns_spy
- proto.dhcp_client
- proto.dhcpd
- misc.of_tutorial
- misc.full_payload
- misc.mac_blocker
- misc.nat
- misc.ip_loadbalancer
- misc.gephi_topo
- log
- log.color
- log.level
- samples.pretty_log
- tk
- host_tracker
- datapaths.pcap_switch
- Developing your own Components
- Stock Components
- POX APIs
- OpenFlow in POX
- OVSDB in POX
- Third-Party Tools, Tutorials, Etc.
- Coding Conventions
- FAQs
- What versions of OpenFlow does POX support?
- What does the
Fields ignored due to unspecified prerequisiteswarning mean? - I tried to install a table entry but got a different one. Why?
- What is a “datapath”? What is a DPID?
- How do I create a firewall / block TCP ports?
- How can I change the OpenFlow port from 6633?
- How can I have some components start automatically every time I run POX?
- How do I get switches to send complete packet payloads to the controller?
- How can I communicate between components?
- How can I use POX with Mininet?
- I’m seeing many packet_in messages and forwarding isn’t working; what gives?
- Does POX support topologies with loops?
- Switches keep disconnecting (especially with Pantou/reference switch). Help?
- Why doesn’t the openflow.webservice component work?
- What are these log messages from the packet subsystem?
- I Installed IP-Based Table Entries But Ping/TCP Doesn’t Work. Why not?
- Does POX support Python 3?
- I’d like to contribute. Can I? Do you have project ideas?
- What’s this warning like “core:Still waiting on 1 component(s)”?
- Why doesn’t POX’s discovery use the normal LLDP MAC address?
- What’s a good strategy for debugging a problem with my POX-based controller?
- I’ve got a problem / bug! Can you help me?
Installing POX
Note
One of POX’s design points is to be easy to install and run. However, especially if this is all very new to you, there are times when you really want to just be able to dive straight in to a working configuration. If this describes you, you may want to skip installing POX altogether and instead download a virtual machine image with POX and software OpenFlow switches preinstalled and ready to go. You can totally do this! Usually the switches are provided by a tool known as Mininet, which allows for complex software OpenFlow networks to be run on a single machine – or within a single virtual machine.
The official Mininet VMs come with POX installed (and can be easily upgraded to the latest version), so they are certainly one option. This option is the one assumed by the Stanford OpenFlow Tutorial, which you may want to follow if you’re looking for a crash course on OpenFlow and POX.
Another option is the SDNHub POX Tutorial which has its own preconfigured VM.
Requirements
POX requires Python 2.7. In practice, it also mostly runs with Python 2.6, and there have been a few commits around March 2013 to improve this somewhat, but nobody is presently really trying to support this. See the FAQ entry Does POX Support Python 3? for the story on Python 3 support. If all you have is Python 2.6, you might want to look into PyPy (see below) or pythonbrew.
POX officially supports Windows, Mac OS, and Linux (though it has been used on other systems as well). A lot of the development happens on Mac OS, so it almost always works on Mac OS. Occasionally things will break for the other OSes; the time it takes to fix such problems is largely a function of how quickly problems are reported. In general, problems are noticed on Linux fairly quickly (especially for big problems) and noticed on Windows rather slowly. If you notice something not working or that seems strange, please submit an issue on the github tracker or send a message to the pox-dev mailing list so that it can be fixed!
POX can be used with the “standard” Python interpreter (CPython), but also supports PyPy (see below).
Getting the Code / Installing POX
The best way to work with POX is as a git repository. You can also grab it as a tarball or zipball, but source control is generally a good thing (if you do want to do this, take a look at the Versions / Downloads page at NOXRepo.org).
POX is hosted on github. If you intend to make modifications to POX itself, you might consider making your own github fork of it from the POX repository page. If you just want to grab it quickly to run or play around with, you can simply create a local clone:
$ git clone http://github.com/noxrepo/pox
$ cd pox
Selecting a Branch / Version
h1. The POX repository has multiple branches. Specifically, it has at least some release branches and at least one active branch. The default branch (what you get if you just do the above commands) will be the most recent release branch. Release branches may get minor updates, but are no longer being actively developed. On the other hand, active branches are being actively developed. In theory, release branches should be somewhat more stable (by which we mean that if you have something working, we aren’t going to break it). On the other hand, active branches will contain improvements (bug fixes, new features, etc.). Whether you should base your work on one or the other depends on your needs. One thing that may factor into your decision is that you’ll probably get better support on the mailing list if you’re using an active branch (lots of answers start with “upgrade to the active branch”).
The main POX branches are named alphabetically after fish. You can see the one you’re currently on with git branch. As of this writing, the branches and the approximate dates during which they were undergoing active development are:
- angler (June 2011 - March 2013)
- betta (Until May 2013)
- carp (Until October 2013)
- dart (Until July 2014)
- eel (...)
This means that (as of this writing!), dart is the most recent release branch, and eel is the current active branch. (Sidenote, angler is the same as the original master branch, which has been removed to avoid confusion.)
To use the dart branch, for example, you simply check it out after cloning the repository:
~$ git clone http://github.com/noxrepo/pox
~$ cd pox
~/pox$ git checkout dart
You can find more information on POX versions / branches on the main NOXRepo site.
PyPy Support
While it’s not as heavily tested as the normal Python interpreter, it’s a goal of POX to run well on the PyPy Python runtime. There are two advantages of this. First, PyPy is generally quite a bit faster than CPython. Secondly, it’s very easily portable – you can easily package up POX and PyPy in a single tarball and have them ready to run.
You can, of course, download, install, and invoke PyPy in the usual way. On Mac OS and Linux, however, POX also supports a really simple method: Download the latest PyPy tarball for your OS, and decompress it into a folder named pypy alongside pox.py. Then just run pox.py as usual (./pox.py), and it should use PyPy instead of CPython.
Invoking POX
Note
Quick Start: If you just want a quick start, try:
./pox.py samples.pretty_log forwarding.l2_learning
POX is invoked by running pox.py or debug-pox.py. The former is meant for running under ordinary circumstances. The latter is meant for when you’re trying to debug problems (it’s a good idea to use debug-pox.py when doing development).
POX itself has a couple of optional commandline arguments than can be used at the start of the commandline:
| option | meaning |
--verbose |
Display extra information (especially useful for debugging startup problems) Note: Generally this is not what you want, and what you want is actually to adjust the logging level via the log.level component. |
--no-cli |
Do not start an interactive shell (No longer applies as of betta) |
--no-openflow |
Do not automatically start listening for OpenFlow connections (Less useful starting with dart, which only loads OpenFlow on demand) |
Todo
Add –unthreaded-sh to the above
But running POX by itself doesn’t do much – POX functionality is provided by components (POX comes with a handful of components, but POX’s target audience is really people who want to be developing their own). Components are specified on the commandline following any of the POX options above. An example of a POX component is forwarding.l2_learning. This component makes OpenFlow switches operate kind of like L2 learning switches. To run this component, you simply name it on the command line following any POX options:
./pox.py --no-cli forwarding.l2_learning
You can specify multiple components on the command line. Not all components work well together, but some do. Indeed, some components depend on other components, so you may need to specify multiple components. For example, you can run POX’s web server component along with l2_learning:
./pox.py --no-cli forwarding.l2_learning web.webcore
Some components take arguments themselves. These follow the component name and (like POX arguments) begin with two dashes. For example, l2_learning has a “transparent” mode where switches will even forward packets that are usually dropped (such as LLDP messages), and the web server’s port number can be changed from the default (8000) to an arbitrary port. For example:
./pox.py --no-cli forwarding.l2_learning --transparent web.webcore --port=8888
(If you’re starting to think that command lines can get a bit long and complex, there’s a solution: write a simple component that just launches other components.)
Components in POX
When we talk about components in POX, what we really mean is something that we can put on the POX command line as described in “Invoking POX”. In the following sections, we discuss some of the components that come with POX and how you can go about creating your own.
Stock Components
POX comes with a number of stock components. Some of these provide core functionality, some provide convenient features, and some are just examples. The following is an incomplete list.
py
This component causes POX to start an interactive Python interpreter that can be useful for debugging and interactive experimentation. Before the betta branch, this was the default behavior (unless disabled with the now obsolete --no-cli). Other components can add functions / values to this interpreter’s namespace (see proto.arp_responder for an example).
forwarding.hub
The hub example just installs wildcarded flood rules on every switch, essentially turning them all into $10 ethernet hubs.
forwarding.l2_learning
This component makes OpenFlow switches act as a type of L2 learning switch. This one operates much like NOX’s “pyswitch” example, although the implementation is quite different. While this component learns L2 addresses, the flows it installs are exact-matches on as many fields as possible. For example, different TCP connections will result in different flows being installed.
forwarding.l2_pairs
Like l2_learning, this component also makes OpenFlow switches act like a type of L2 learning switch. However, this one is probably just about the simplest possible way to do it correctly. Unlike l2_learning, l2_pairs installs rules based purely on MAC addresses.
forwarding.l3_learning
This component is not quite a router, but it’s also definitely not an L2 switch. It’s an L3-learning-switchy-thing. Perhaps the most useful aspect of it is that it serves as a pretty good example of using POX’s packet library to examine and construct ARP requests and replies.
l3_learning does not really care about conventional IP stuff like subnets – it just learns where IP addresses are. Unfortunately, hosts usually do care about that stuff. Specifically, if a host has a gateway set for some subnet, it really wants to communicate with that subnet through that gateway. To handle this, you can specify “fake gateways” in the commandline to l3_learning, which will make hosts happy. For example, if you have some machines which think they’re on 10.x.x.x and others that think they’re on 192.168.0.x and they think there are gateways at the ”.1” addresses:
./pox.py forwarding.l3_learning --fakeways=10.0.0.1,192.168.0.1
forwarding.l2_multi
This component can still be seen as a learning switch, but it has a twist compared to the others. The other learning switches “learn” on a switch-by-switch basis, making decisions as if each switch only had local information. l2_multi uses openflow.discovery to learn the topology of the entire network: as soon as one switch learns where a MAC address is, they all do. Note that this means you must include openflow.discovery on the commandline.
forwarding.l2_nx
A quick-and-dirty learning switch for Open vSwitch – it uses Nicira extensions as found in Open vSwitch.
Run with something like:
./pox.py openflow.nicira --convert-packet-in forwarding.l2_nx
This forwards based on ethernet source and destination addresses. Where l2_pairs installs rules for each pair of source and destination address, this component uses two tables on the switch – one for source addresses and one for destination addresses.
Note that unlike the other learning switches we keep no state in the controller. In truth, we could implement this whole thing using OVS’s learn action, but doing it something like is done here will still allow us to implement access control or something at the controller.
forwarding.topo_proactive
Installs forwarding rules based on topologically significant IP addresses. We also issue those addresses by DHCP. A host must use the assigned IP!
Most rules are installed proactively. This component was added in the carp branch. The routing code is based on forwarding.l2_multi.
Depends on openflow.discovery and at least sort of works with openflow.spanning_tree (not particularly tested or examined).
openflow.spanning_tree
This component uses the discovery component to build a view of the network topology, constructs a spanning tree, and then disables flooding on switch ports that aren’t on the tree. The result is that topologies with loops no longer turn your network into useless hot packet soup.
Note that this does not have much of a relationship to Spanning Tree Protocol. They have similar purposes, but this is a rather different way of going about it.
The samples.spanning_tree component demonstrates this module by loading it and one of several forwarding components.
This component has two options which alter the startup behavior:
--no-flood disables flooding on all ports as soon as a switch connects; on some ports, it will be enabled later.
--hold-down prevents altering of flood control until a complete discovery cycle has completed (and thus, all links have had an opportunity to be discovered).
Thus, the safest (and probably the most sensible) invocation is openflow.spanning_tree --no-flood --hold-down .
openflow.webservice
A simple JSON-RPC-ish web service for interacting with OpenFlow. It’s derived from the of_service messenger service, so see its docs (in the reference/pydoc) for some additional details.
It requires the webcore component. You access it by sending an HTTP POST to http://wherever_webcore_is_running/OF/. The POST data is a JSON string containing (at least) a “method” key containing the name of the method to invoke, and a “params” key which contains a dictionary of argument names and their values.
Current methods include:
| method | description | arguments |
|---|---|---|
| set_table | Sets the flow table on a switch. | dpid - a string dpid flows - a list of flow entries |
| get_switch_desc | Gets switch details. | dpid - a string dpid |
| get_flow_stats | Get list of flows in a table. | dpid - a string dpid match - match structure (optional, defaults to match all) table_id - table for flows (defaults to all) out_port - filter by out port (defaults to all) |
| get_switches | Get list of switches and their basic info. | None. |
Example: Get list of connected switches
This is pretty easy:
curl -i -X POST -d '{"method":"get_switches","id":1}' http://127.0.0.1:8000/
Note the use of the “id” field. This is a requirement of JSON-RPC as per the various specfications. Without it, the call is interpreted as a notification – for which the server should not return a value. POX doesn’t really care much what you put in this field, though the JSON-RPC specs do say some stuff about it which you would be wise to not entirely ignore. An integer is a safe bet.
Note
If you don’t include an “id” key, you will not get a response! The above paragraph explains why, but it’s worth pointing it out again!
Example: Making a hub using the webservice
We can turn the switch with DPID 00-00-00-00-00-01 into a hub by inserting a table entry which matches all packets and sends them to the special OFPP_ALL port.
curl -i -X POST -d '{"method":"set_table","params":{"dpid":"00-00-00-00-00-01", \
                   "flows":[{"actions":[{"type":"OFPAT_OUTPUT","port":"OFPP_ALL"}], \
                   "match":{`]`' http://127.0.0.1:8000/OF/
web.webcore
The webcore component starts a web server within the POX process. Other components can interface with it to provide static and dynamic content of their own.
messenger
The messenger component provides an interface for POX to interact with external processes via bidirectional JSON-based messages. The messenger by itself is really just an API, actual communication is implemented by transports. Currently, transports exist for TCP sockets and for HTTP. Actual functionality is implemented by services. POX comes with a few services. messenger.log_service allows for interacting with the log remotely (reading it, reconfiguring it, etc.). openflow.of_service allows for some OpenFlow operations (e.g., listing switches, setting flow entries, etc.). There are also a few small example services in the messenger package, and pox-log.py (in the tools directory) is a small, standalone, external Python application which interfaces with the the logging service over TCP.
By writing a new service, it becomes available over any transport. Similarly, writing a new transport allows for accessing any service in a new way.
The messenger package in the repository has a fair amount of comments. Additionally, you can see POXDesk (mentioned elsewhere) as an example of both implementing a new service, and communicating with messenger over HTTP from JavaScript.
Getting Started with the Messenger Component
To get messenger running, run the messenger component along with some transport(s). For the sake of example, we’ll run the passive (listening) TCP transport and the example messenger service:
1 2 3 4 5 6 7 8 | [pox_dart]$ ./pox.py log.level --DEBUG messenger messenger.tcp_transport messenger.example
POX 0.3.0 (dart) / Copyright 2011-2014 James McCauley, et al.
DEBUG:boot:Not launching of_01
DEBUG:core:POX 0.3.0 (dart) going up...
DEBUG:core:Running on CPython (2.7.5/Sep 12 2013 21:33:34)
DEBUG:messenger.tcp_transport:Listening on 0.0.0.0:7790
DEBUG:core:Platform is Darwin-13.1.0-x86_64-i386-64bit
INFO:core:POX 0.3.0 (dart) is up.
|
Now we can connect and use services by connecting to the listening messenger socket. We can demonstrate this with the test_client.py program. On starting it up, it connects to the default host/port which gets POX, and messenger sends us a welcome:
1 2 3 4 5 6 7 | [messenger]$ python test_client.py
Connecting to 127.0.0.1:7790
Recv: {
"cmd": "welcome",
"CHANNEL": "",
"session_id": "bQ6QCYI3ICOGLJPOT7HMVXTN7RE"
}
|
We can then send a message to one of the bots that the example service set up. We’ll use the “upper” service which just capitalizes messages you send to it. Line 8 is typed into test_client.py to send a message, and the rest is the reply from POX:
8 9 10 11 12 13 | {"CHANNEL":"upper","msg":"hello world"}
Recv: {
"count": 1,
"msg": "HELLO WORLD",
"CHANNEL": "upper"
}
|
openflow.of_01
This component communicates with OpenFlow 1.0 (wire protocol 0x01) switches. When other components that use OpenFlow are loaded, this component is usually started with default values automatically. However, you may want to launch it manually in order to change its options. You may also want to launch it manually to run it multiple times (e.g., to listen for OpenFlow connections on multiple ports).
| option | default | notes |
|---|---|---|
| 6633 | Specifies the TCP port to listen for connections on | |
| all addresses | Specifies the IP addresses of interfaces to listen on | |
| None | Enables SSL mode and specifies a key file | |
| None | Enables SSL mode and specifies a certificate file | |
| None | Enables SSL mode and specifies a certificate to validate switches |
To configure SSL, the Open vSwitch INSTALL.SSL file and the man page for ovs-controller have a lot of useful info, including info on how to generate the appropriate files to be passed for the various arguments of this component.
openflow.discovery
This component sends specially-crafted LLDP messages out of OpenFlow switches so that it can discover the network topology. It raises events (which you can listen to) when links go up or down.
More specifically, you can listen to LinkEvent events on core.openflow_discovery. When a link is detected, such an event is raised with the .added attribute set to True. When a link is detected as having been removed or failed, the .removed attribute is set to True. LinkEvent also has a .link attribute, which is a Link object, and a port_for_dpid(<dpid>) method (pass it the DPID of one end of the link and it will tell you the port used on that datapath).
Link objects have the following attributes:
| name | value |
|---|---|
| dpid1 | The DPID of one of the switches involved in the link |
| port1 | The port on dpid1 involved in the link |
| dpid2 | The DPID of the other switch involved in the link |
| port2 | The port on dpid2 |
| uni | A “unidirectional” version of the link. This normalizes the order of the DPIDs and ports, allowing you to compare two links (which may be different directions of the same physical links). |
| The ends of the link as a tuple, i.e., end[0] = (dpid1,port1) |
A number of the other example components use discovery and can serve as demonstrations for using discovery. Obvious possibilities are misc.gephi_topo and forwarding.l2_multi.
openflow.debug
Loading this component will cause POX to create pcap traces containing OpenFlow messages, which you can then load into Wireshark to analyze. All the headers are synthetic so it’s not totally a replacement for actually running tcpdump or Wireshark. It does, however, have the nice property that there is exactly one OpenFlow message in each frame (which makes it easier to look at!).
openflow.keepalive
This component causes POX to send periodic echo requests to connected switches. This addresses two issues.
First, some switches (including the reference switch) will assume that an idle control connection indicates a loss of connectivity to the controller and will disconnect after some period of silence (often not particularly long). This behavior is almost certainly broken: one can easily argue that if the switches want to disconnect when the connection is idle, it is their responsibility to send echo requests, but arguing won’t fix the switches.
Secondly, if you lose network connectivity to the switch, you don’t immediately get a FIN or a RST, so it’s hard to say exactly when you’ll notice that you’ve lost the switch. By sending echo requests and tracking their responses, you get a bound on how long it will take to notice.
Todo
This component is badly named and will probably be renamed in a future version (possibly eel).
proto.pong
The pong component is a sort of silly example which simply watches for ICMP echo requests (pings) and replies to them. If you run this component, all pings will seem to be successful! It serves as a simple example of monitoring and sending packets and of working with ICMP.
proto.arp_responder
An ARP utility that can learn and proxy ARPs, and can also answer queries from a list of static entries. This component also adds the ARP table to the interactive console as “arp” – allowing you to interactively query and modify it.
Simply specify IP addresses and the ethernet address you want to associate with them as options:
proto.arp_responder --192.168.0.1=00:00:00:00:00:01 --192.168.0.2=00:00:00:00:00:02
info.packet_dump
A simple component that dumps packet_in info to the log. Sort of like running tcpdump on a switch.
proto.dns_spy
This component monitors DNS replies and stores their results. Other components can examine them by accessing core.DNSSpy.ip_to_name[<ip address>] and core.DNSSpy.name_to_ip[<domain name>].
proto.dhcp_client
A DHCP client component. This is probably not useful on its own, but can be useful in conjunction with other components.
proto.dhcpd
This is a simple DHCP server. By default, it claims to be 192.168.0.254, and serves clients addresses in the range 192.168.0.1 to 192.168.0.253, claiming itself to be the gateway and the DNS server.
Note: You might want to use proto.arp_responder to make 192.168.0.254 (or whatever you choose as the IP address) ARP-able.
There are a number of options you can configure:
| Option | Meaning |
|---|---|
| network | Subnet to allocate addresses from, e.g., “192.168.0.0/24” or “10.0.0.0/255.0.0.0” |
| first | First’th address in subnet to use (256 is x.x.1.0 in a /16). |
| last | Last’th address in subnet to use (258 is x.x.1.2 in a /16). If ‘None’, use rest of valid range. |
| count | Alternate way to specify last address to use |
| ip | IP to use for DHCP server |
| router | Router IP to tell clients. Defaults to whatever is set for ip. ‘None’ will stop the server from telling clients anything. |
| dns | DNS server to tell clients. Defaults to whatever is set for router. ‘None’ will stop the server from telling clients anything. |
Example:
proto.dhcpd --network=10.1.1.0/24 --ip=10.1.1.1 --first=10 --last=None --router=None --dns=4.2.2.1
You can also launch this component as proto.dhcpd:default to serve 192.168.0.100-199.
Right before issuing an address, the DHCP server raises a DHCPLease event which you can listen to if you want to learn or deny address allocations:
def _I_hate_00_00_00_00_00_03 (event):
  if event.host_mac == EthAddr("00:00:00:00:00:03"):
    event.nak() # Deny it!

core.DHCPD.addListenerByName('DHCPLease', _I_hate_00_00_00_00_00_03)
misc.of_tutorial
This component is for use with the OpenFlow tutorial. It acts as a simple hub, but can be modified to act like an L2 learning switch.
misc.full_payload
By default, when a packet misses the table on a switch, the switch may only send part of the packet (the first 128 bytes) to the controller. This component reconfigures every switch that connects so that it will send the full packet.
misc.mac_blocker
This component is meant to be used alongside some other reactive forwarding applications, such as l2_learning and l2_pairs. It pops up a Tkinter-based GUI that lets you block MAC addresses.
It works by wedging its own PacketIn handler in front of the PacketIn handler of the forwarding component. When it wants to block something, it kills the event by returning EventHalt. Thus, the forwarding component never sees the packet/event, never sets up a flow, and the traffic just dies.
Thus, it demonstrates Tkinter-based GUIs in POX as well as some slightly-advanced event handling (using higher-priority event handlers to block PacketIns). See the pox.lib.revent section of this manual for more on working with events, and see the FAQ entry for creating a firewall for another not-entirely-dissimilar example that blocks TCP ports.
misc.ip_loadbalancer
This component (which started in the carp branch) is a simple TCP load balancer.
./pox.py misc.ip_loadbalancer --ip=<Service IP> --servers=<Server1 IP>,<Server2 IP>,... [--dpid=<dpid>]
Give it a service_ip and a list of server IP addresses. New TCP flows to the service IP will be randomly redirected to one of the server IPs.
Servers are periodically probed to see if they’re alive by sending them ARPs.
By default, it will make the first switch that connects into a load balancer and ignore the other switches. If you have a topology with multiple switches, it probably makes more sense to specify which one should be the load balancer, and this can be done with the --dpid commandline option. In this case, you probably want the rest of the switches to do something worthwhile (like forward traffic), and you may have to create a component that does this for you. For example, you might create a simple component which does the same thing as forwarding.l2_learning on all the switches besides the load balancer. You could do that with a simple component like the following:
1 2 3 4 5 6 7 8 9 10 11 12 13 14 15 16 17 | """
More or less just l2_learning except it ignores a particular switch
"""
from pox.core import core
from pox.lib.util import str_to_dpid
from pox.forwarding.l2_learning import LearningSwitch
def launch (ignore_dpid):
ignore_dpid = str_to_dpid(ignore_dpid)
def _handle_ConnectionUp (event):
if event.dpid != ignore_dpid:
core.getLogger().info("Connection %s" % (event.connection,))
LearningSwitch(event.connection, False)
core.openflow.addListenerByName("ConnectionUp", _handle_ConnectionUp)
|
misc.gephi_topo
Streams detected topology to Gephi.
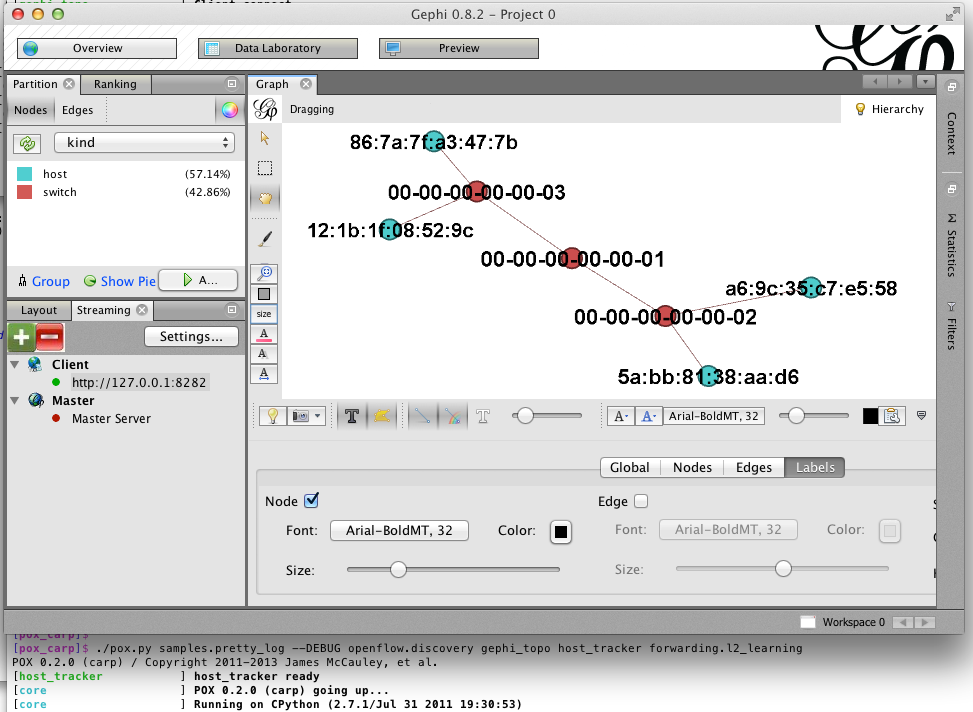
Gephi is a pretty awesome open-source, multiplatform graph visualization/manipulation/analysis package. It has a plugin for streaming graphs back and forth between it and something else over a network connection. The gephi_topo component uses this to provide visualization for switches, links, and (optionally) hosts detected by other POX components. There’s a blog post about this component on noxrepo.org.
This component is loosely based on POXDesk’s tinytopo module. It requires discovery, and host_tracker is optional.Example usage:
./pox.py openflow.discovery misc.gephi_topo host_tracker forwarding.l2_learning
In July of 2014, Rizwan Jamil posted a message on pox-dev describing explicit steps for getting this up and running in Ubuntu.
log
POX uses Python’s logging system, and the log module allows you to configure a fair amount of this through the commandline. For example, you can send the log to a file, change the format of log messages to include the date, etc.
Log Formatting
Please see the documentation on Python’s LogRecord attributes for details on log formatting. As a quick example, you can add timestamps to your log as follows:
./pox.py log --format="%(asctime)s: %(message)s"
Or with simpler timestamps:
./pox.py log --format="[%(asctime)s] %(message)s" --datefmt="%H:%M:%S"
See the samples.pretty_log component for another example (and, particularly, for an example that uses POX’s color logging extension).
Log Output
Log messages are processed by various handlers which then print the log to the screen, save it to a file, send it over the network, etc. You can write your own, but Python also comes with quite a few, which are documented in the Python reference for logging.handlers. POX lets you configure a lot of Python’s built-in handlers from the commandline; you should refer to the Python reference for the arguments, but specifically, POX lets you configure:
| Name | Type |
|---|---|
| stderr | StreamHandler for stderr stream |
| stdout | StreamHandler for stdout stream |
| File | FileHandler for named file |
| WatchedFile | WatchedFileHandler |
| RotatingFile | RotatingFileHandler |
| TimedRotatingFile | TimedRotatingFileHandler |
| Socket | SocketHandler - Sends to TCP socket |
| Datagram | DatagramHandler - Sends over UDP |
| SysLog | SysLogHandler - Outputs to syslog service |
| HTTP | HTTPHandler - Outputs to a web server via GET or POST |
To use these, simply specify the Name, followed by a comma-separated list of the positional arguments for the handler Type. For example, FileHandler takes a file name, and optionally an open mode (which defaults to append), so you could use:
./pox.py log --file=pox.log
Or if you wanted to overwrite the file every time:
./pox.py log --file=pox.log,w
You can also use named arguments by prefacing the entry with a * and then using a comma-separated list of key=value pairs. For example:
./pox.py log --*TimedRotatingFile=filename=foo.log,when=D,backupCount=5
log.color
The log.color module colorizes the log when possible. This is actually pretty nice, but getting the most out of it takes a bit more configuration – you might want to take a look at samples.pretty_log.
Color logging should work fine out-of-the-box on Mac OS, Linux, and other environments with the real concept of a terminal. On Windows, you need a colorizer such as colorama.
log.level
POX uses Python’s logging infrastructure. Different components each have their own loggers, the name of which is displayed as part of the log message. Loggers actually form a hierarchy – you might have a “foo” logger with a “bar” sub-logger, which together would be known as “foo.bar”. Additionally, each log message has a “level” associated with it, which corresponds to how important (or severe) the message is. The log.level component lets you configure which loggers show what level of detail. The log levels from most to least severe are:
CRITICAL |
ERROR |
WARNING |
INFO |
DEBUG |
POX’s default level is INFO. To set a different default (e.g., a different level for the “root” of the logger hierarchy):
./pox.py log.level --WARNING
If you are trying to debug a problem with OpenFlow connections, however, you may want to turn up the verbosity of OpenFlow-related logs. You can adjust all OpenFlow-related log messages like so:
./pox.py log.level --WARNING --openflow=DEBUG
If this leaves you with too many DEBUG level messages from openflow.discovery which you are not interested in, you can then turn it down specifically:
./pox.py log.level --WARNING --openflow=DEBUG --openflow.discovery=INFO
samples.pretty_log
This simple module uses log.color and a custom log format to provide nice, functional log output on the console.
tk
This component is meant to assist in building Tk-based GUIs in POX, including simple dialog boxes. It is quite experimental.
host_tracker
This component attempts to keep track of hosts in the network – where they are and how they are configured (at least their MAC/IP addresses). When things change, the component raises a HostEvent.
For an example host_tracker usage, see the misc.gephi_topo component.
In short, host_tracker works by examining packet-in messages, and learning MAC and IP bindings that way. We then periodically ARP-ping hosts to see if they’re still there. Note that this means it relies on packets coming to the controller, so forwarding must be done fairly reactively (as with forwarding.l2_learning), or you must install additional flow entries to bring packets to the controller.
You can set various timeouts (in seconds) from the commandline. Names and defaults:
| Name | Default | Meaning |
|---|---|---|
| arpAware | 60*2 | Quiet ARP-responding entries are pinged after this |
| arpSilent | 60*20 | This is for quiet entries not known to answer ARP |
| arpReply | 4 | Time to wait for an ARP reply before retrial |
| timerInterval | 5 | Seconds between timer routine activations |
| entryMove | 60 | Minimum expected time to move a physical entry |
Good values for testing:
--arpAware=15 --arpSilent=45 --arpReply=1 --entryMove=4
You can also specify how many ARP pings we try before deciding it failed:
--pingLim=2
datapaths.pcap_switch
This component implements the switch side of OpenFlow – making an OpenFlow switch which can connect to an OpenFlow controller (which could be the same instance of POX, a different instance of POX, or some other OpenFlow controller altogether!) and forward packets.
It is based on a somewhat more abstract superclass which can be used to implement the switch side of OpenFlow without forwarding packets – e.g., to provide a “virtual” OpenFlow switch (along the lines of FlowVisor), to provide just the OpenFlow interface on top of some other forwarding mechanism (e.g., Click), etc. This is also useful for prototyping OpenFlow extensions or for debugging (it’s relatively easy to modify it to simulate conditions which trigger bugs in controllers, for example). It is not meant to be a production switch – the performance is not particularly good!
Developing your own Components
This section tries to get you started developing your own components for POX. In some cases, you might find that an existing component does almost what you want. In these cases, you might start by making a copy of that component and working from there.
The “ext” directory
As discussed, POX components are really just Python modules. You can put your Python code wherever you like, as long as POX can find it (e.g., it’s in the PYTHONPATH environment variable). One of the top-level directories in POX is called “ext”. This “ext” directory is a convenient place to build your own components, as POX automatically adds it to the Python search path (that is, looks inside it for additional modules), and it is excluded from the POX git repository (meaning you can easily check out your own repositories into the ext directory).
Thus, one common way to start building your own POX module is simply to copy an existing module (e.g., forwarding/l2_learning.py) into the ext directory (e.g., ext/my_component.py). You can then modify the new file and invoke POX as ./pox.py my_component.
The launch function
While naming a loadable Python module on the commandline is enough to get POX to load it, a proper POX component should contain a launch function. In the generic sense, a launch function is a function that POX calls to tell the component to initialize itself. This is usually a function actually named launch, though there are exceptions. The launch function is how commandline arguments are actually passed to the component.
A Simple Example
The POX commandline, as mentioned above, contains the modules you want to load. After each module name is an optional set of parameters that go with the module. For example, you might have a commandline like:
./pox.py foo --bar=3 --baz --spam=disabled
Since the module name is foo, we have either a directory called foo somewhere that POX can find it that contains an __init__.py, or we simply have a foo.py somewhere that POX can find it (e.g., in the ext directory). At the bare minimum, it might look like this:
def launch (bar, baz = "eggs", spam = True):
  print "foo:", bar, baz, spam
Note that bar has no default value, which makes the bar parameter not optional. Attempting to run ./pox.py foo with no arguments will complain about the lack of a value for bar. Notice that in the example given, bar receives the string value “3”. In fact, all arguments come to you as strings – if you want them as some other type, it is your responsibility to convert them.
The one exception to the “all arguments are strings” rule is illustrated with the baz argument. It’s specified on the commandline, but not given a value. So what does baz actually receive in the launch() function? Simple: It receives the Python True value. (If it hadn’t been specified on the commandline, of course, it would have received the string “eggs”.)
Note that the spam value defaults to True. What if we wanted to send it a false value – how would we do that? We could try --spam=False, but that would just get us the string “False” (which if we tested for truthiness is actually Truthy!). And if we just did --spam, that would get us True, which isn’t what we want at all. This is one of those cases where you have to explicitly convert the value from a string to whatever type you actually want. To convert to an integer or a floating point value, you could simply use Python’s built-in int() or float(). For booleans, you could write your own code, but you might consider pox.lib.util‘s str_to_bool() function which is pretty liberal about accepting things like “on” or “true” or “enabled” as meaning True, and sees everything else as False.
Multiple Invocation
Now what if we were to try the following commandline?
./pox.py foo --bar=1 foo --bar=2
You might expect to see:
foo: 1 eggs True
foo: 2 eggs True
Instead, however, you get an exception. POX, by default, only allows components to be invoked once. However, a simple change to your launch() function allows multiple-invocation:
def launch (bar, baz = "eggs", spam = True, __INSTANCE__ = None):
  print "foo:", bar, baz, spam
If you try the above commandline again, this time it will work. Adding the __INSTANCE__ parameter both flags the function as being multiply-invokable, and also gets passed some information that can be useful for some modules that are invoked multiple times. Specifically, it’s a tuple containing:
- The number of this instance (0...n-1)
- The total number of instances for this module
Trueif this is the last instance,Falseotherwise (just a comparison between the previous two, but it’s handy)
You might, for example, only want your component to do some of its initialization once, even if your component is specified multiple times. You can easily do this by only doing that part of your initialization if the last value in the tuple is True.
You might also wish to examine the minimal component given in section “OpenFlow Events: Responding to Switches”. And, of course, check out the code for POX’s existing components.
Todo
Someone should write a lot more about developing components.
POX APIs
POX contains a number of APIs to help you develop network control applications. Here, we attempt to describe some of them. It is certainly not exhaustive so feel free to contribute.
Working with POX: The POX Core object
POX has an object called “core”, which serves as a central point for much of POX’s API. Some of the functions it provides are just convenient wrappers around other functionality, and some are unique. However, one of the other major purposes of the core object is to provide a rendezvous between components. Often, rather than using import statements to have one component import another component so that they can interact, components will instead “register” themselves on the core object, and other components will query the core object. A major advantage to this approach is that the dependencies between components are not hard-coded, and different components which expose the same interface can be easily interchanged. Thought of another way, this provides an alternative to Python’s normal module namespace, which is somewhat easier to rearrange.
Many modules in POX will want to access the core object. By convention, this is doing by importing the core object as so:
from pox.core import core
Todo
Write more about this!
Registering Components
As mentioned above, it can be convenient for a component to “register” an API-providing object on the core object. An example of this can be found in the OpenFlow implementation – the POX OpenFlow component by default registers an instance of OpenFlowNexus as core.openflow, and other applications can then access a lot of the OpenFlow functionality from there. There are basically two ways to register a component – using core.register() and using core.registerNew(). The latter is really just a convenience wrapper around the former.
core.register() takes two arguments. The second is the object we want to register on core. The first is what name we want to use for it. Here’s a really simple component with a launch() function which registers the component as core.thing:
class MyComponent (object):
  def __init__ (self, an_arg):
    self.arg = an_arg
    print "MyComponent instance registered with arg:", self.arg

  def foo (self):
    print "MyComponent with arg:", self.arg


def launch ():
  component = MyComponent("spam")
  core.register("thing", component)
  core.thing.foo() # prints "MyComponent with arg: spam"
In the case of, for example, launch functions which can be invoked multiple times, you may still only want to register an object once. You could simply check if the component has already been registered (using core.hasComponent()), but this can also be done with core.registerNew(). While you pass a specific object to core.register(), you pass a class to core.registerNew(). If the named component has already been registered, registerNew() just does nothing.
registerNew() generally takes a single parameter – the class you want it to instantiate. If that class’s:mono: __init__ method takes arguments, you can pass them as additional parameters to registerNew(). For example, we might change the launch function above to:
def launch ():
  core.registerNew(MyComponent, "spam")
  core.MyComponent.foo() # prints "MyComponent with arg: spam"
Note that registerNew() automatically registers the given object using the object’s class name (that is, it’s now “MyComponent” instead of “thing”). This can be overridden by giving the object an attribute called _core_name:
class MyComponent (object):
  _core_name = "thing"

  def __init__ (self, an_arg):
    self.arg = an_arg
    print "MyComponent instance registered with arg:", self.arg

  def foo (self):
    print "MyComponent with arg:", self.arg
Dependency and Event Management
When components in POX are dependent on other components (i.e., objects registered on core), it’s often (though not always) because they want to listen to events of that other component. POX’s contains a useful function which makes it pretty easy to both “depend” on another component in a sane way and also to set up event handlers for you: core.listen_to_dependencies().
listen_to_dependencies‘s arguments:
sink, components=None, attrs=True, short_attrs=False, listen_args={}
And here’s its docstring more or less verbatim:
Look through
sinkfor handlers named like_handle_<ComponentName>_<EventName>. Use that to build a list of components, and append any components explicitly specified bycomponents.
listen_argsis a dict of"component_name":{"arg_name":"arg_value",...}, allowing you to specify additional arguments toaddListeners().When all the referenced components are registered, do the following:
- Set up all the event listeners
- Call
._all_dependencies_met()onsinkif it exists- If
attrs=True, set attributes onsinkfor each component (e.g,sink._openflow_would be set to core.openflow)For example, if “topology” is a dependency, a handler for topology’s
SwitchJoinevent must be defined as so:def _handle_topology_SwitchJoin (self, ...):
If dependencies specified in this fashion are not resolved during POX’s startup phase, a message is logged about POX still waiting on some component (e.g., “core:Still waiting on 1 component(s)”). The debug-level log will contain more detailed information on this subject. See the FAQ entry on this subject.
Working with Addresses: pox.lib.addresses
IPv4, IPv6, and Ethernet addresses in POX are represented by the IPAddr, IPAddr6, and EthAddr classes of pox.lib.addresses. In some cases, other address formats may work (e.g., dotted-quad IP addresses), but using the address classes should always work.
For example, when working with IP addresses:
from pox.lib.addresses import IPAddr, IPAddr6, EthAddr

ip = IPAddr("192.168.1.1")
print str(ip) # Prints "192.168.1.1"
print ip.toUnsignedN() # Convert to network-order unsigned integer -- 16885952
print ip.raw # Returns a length-four bytes object (a four byte string, more or less)

ip = IPAddr(16885952,networkOrder=True)
print str(ip) # Also prints "192.168.1.1" !
pox.lib.addresses also contains various utility functions for parsing netmasks, CIDR notation, checking whether an IP is within a specific subnet, and so on.
The Event System: pox.lib.revent
Event Handling in POX fits into the publish/subscribe paradigm. Certain objects publish events (in revent lingo, this is “raising” an event; also sometimes called “sourcing”, “firing” or “dispatching” an event). One can then subscribe to specific events on these objects (in revent lingo, this is “listening to”; sometimes also “handling” or “sinking”); what we mean by this is that when the event occurs, we’d like a particular piece of code to be called (an “event handler” or sometimes an “event listener”). (If there’s one thing we can say about events, it’s that there’s no shortage of terminology.)
Note
The revent library can actually do some weird stuff. POX only uses a fairly non-weird subset of its functionality, and mostly uses a pretty small subset of that subset! What is described in this section is the subset that POX makes use of most heavily.
Events in POX are all instances of subclasses of revent.Event. A class that raises events (an event source) inherits from revent.EventMixin, and declares which events it raises in a class-level variable called _eventMixin_Events. Here’s an example of a class that raises two events:
class Chef (EventMixin):
  """
  Class modeling a world class chef

  This chef only knows how to prepare spam, but we assume does it really well.
  """
  _eventMixin_events = set([
    SpamStarted,
    SpamFinished,
  ])
Handling Events
So perhaps your program has an object of class Chef called chef. You know it raises a couple events. Maybe you’re interested in when your delicious spam is ready, so you’d like to listen to the SpamFinished event.
Event Handlers
First off, let’s see exactly what an event listener looks like. For one thing: it’s a function (or a method or some other thing that’s callable). They almost always just take a single argument – the event object itself (though this isn’t always the case – an event class can change this behavior, in which case, its documentation should mention it!). Assuming SpamFinished is a typical event, it might have a handler like:
def spam_ready (event):
  print "Spam is ready!  Smells delicious!"
Listening To an Event
Now we need to actually set our spam_ready function to be a listener for the SpamFinished event:
chef.addListener(SpamFinished, spam_ready)
Sometimes you may not have the event class (e.g., SpamFinished) in scope. You can import it if you want, but you can also use the addListenerByName() method instead:
chef.addListenerByName("SpamFinished", spam_ready)
Automatically Setting Listeners
Often, your event listener is a method on a class. Also, you often are interested in listening to multiple events from the same source object. revent provides a shortcut for this situation: addListeners().
class HungryPerson (object):
  """ Models a person that loves to eat spam """

  def __init__ (self):
    chef.addListeners(self)

  def _handle_SpamStarted (self, event):
    print "I can't wait to eat!"

  def _handle_SpamFinished (self, event):
    print "Spam is ready!  Smells delicious!"
When you call foo.addListeners(bar), it looks through the events of foo, and if it sees a method on bar with a name like _handle_*EventName*, it sets that method as a listener.
In some cases, you may want to have a single class listening to events from multiple event sources. Sometimes it’s important that you can tell the two apart. For this purpose, you can also use a “prefix” which gets inserted into the handler names:
class VeryHungryPerson (object):
  """ Models a person that is hungry enough to need two chefs """

  def __init__ (self):
    master_chef.addListeners(self, prefix="master")
    backup_chef.addListeners(self, prefix="secondary")

  def _handle_master_SpamFinished (self, event):
    print "Spam is ready!  Smells delicious!"

  def _handle_secondary_SpamFinished (self, event):
    print "Backup spam is ready.  Smells slightly less delicious."
Creating Your Own Event Types
As noted above, events are subclasses of revent.Event. So to create an event, simply create a subclass of Event. You can add any extra attributes or methods you want. Continuing our example:
class SpamStarted (Event):
  def __init__ (self, brand = "Hormel"):
    Event.__init__(self)
    self.brand = brand

  @property
  def genuine (self):
    # If it's not Hormel, it's just canned spiced ham!
    return self.brand == "Hormel"
Note that you should explicitly call the superclass’s __init__() method! (You can do this as above, or using the new-school super(MyEvent, self).__init__().)
Note
In newer versions of POX, calling the superclass __init__() is no longer required.
Voila! You can now raise new instances of your event!
Note that in our handlers for SpamStarted events, we could have accessed the brand or genuine attributes on the event object that gets passed to the handler.
Note: While revent doesn’t care what you name your event classes, if you are using POX’s listen_to_dependencies() mechanism (described below), the class names must not contain an underscore (which is consistent with POX naming style, described in a later section).
Raising Events
To raise an event so that listeners are notified, you just call raiseEvent on the object that will publish the event:
# One way to do it
chef.raiseEvent(SpamStarted("Generic"))

# Another way (slightly preferable)
chef.raiseEvent(SpamStarted, "Generic")
(The second way is slightly preferable because if there are no listeners, it avoids ever even creating the event object.)
Often, a class will raise events on itself (self.raiseEvent(...)), but as you see in the example above, this isn’t necessarily the case.
There is a variant of raiseEvent() called raiseEventNoErrors(). This behaves much the same as raiseEvent(), but exceptions in event handlers are caught automatically.
Binding to Components’ Events
Often, event sources are “components” in that they’ve registered an object on the POX core object, and it’s that object which sources events you want to listen to. While you can certainly use the above methods for adding listeners, the core object also has the useful listen_to_dependencies() method, which is documented in the section The POX Core object.
Advanced Topics in Event Handling
Events With Multiple Listeners
Above, we described the basics for handling events and demonstrated how to set listeners. A given source and event can have any number of listeners – you don’t have to do anything special to support that. Here, however, we should discuss two issues which sometimes pop up when there are multiple listeners (often together).
The first of these is: when there are multiple listeners, in what order are they called? By default, the answer is that it’s undefined. However, this can be overridden by specifying priority in your call to addListener() or addListeners(). Priorities should be integers; higher numbers mean call this listener sooner. Listeners with no priority set are equivalent to priority 0 – you can use negative priorities to be called after these.
This brings us to the second issue: halting events. When an event handler is invoked, it has an opportunity to halt the event – stopping further handlers from being invoked for that method. This is generally used sort of like a filter: a higher priority handler sees the event first, halts the event if it handles it, or (if it doesn’t handle it) allows a later listener to handle it. This is the mechanism that the mac_blocker component uses, for example: it halts PacketIn events for blocked addresses, but allows them to pass to a forwarding component for unblocked addresses. To halt an event, you may either set the .halt attribute of the event object to True, or have the listener return EventHalt (or EventHaltAndRemove; see below). In the latter case, you’ll need to import EventHalt from pox.lib.revent.
Removing Listeners and One-Time Events
In many cases, it’s sufficient to set up a listener and forget about it forever. However, it is sometimes the case that you want to stop listening to an event. There are a few different ways to do this.
The first way is very similar to halting an event as described above: the handler just returns EventRemove (or EventHaltAndRemove). Of course, this can only be done from inside the handler at the time an event as actually being handled. If you’d like to remove the handler from outside the handler, you can use the removeListener() method. The easiest way to use this is simply to pass it an “event ID”. Although not discussed earlier, this is the return value of addListener(). Thus, you can easily save the return value from addListener() and pass it to removeListener() later to unhook the handler. Things work pretty much as you’d hope for addListeners() as well – it returns a sequence of event IDs, which can be simply passed to removeListeners().
revent contains a special shortcut for a fairly common case: when you care about an event only the first time it fires. Simply pass once=True into addListener(), and the listener is automatically removed after the first time it’s fired.
Weak Event Handlers
By default, when a listening to an event source, this creates a reference to the source. Generally, this means that the lifetime of the event source is now bound to the lifetime of the event handler. Often this is just fine (and even desirable). However, there are exceptions. To provide for these exceptions, one can pass weak=True into addListener(). This creates a weak reference: if the source object has no other references, the listener is removed automatically.
Working with packets: pox.lib.packet
Lots of applications in POX interact with packets (e.g., you might want to construct packets and send them out of a switch, or you may receive them from a switch via an ofp_packet_in OpenFlow message). To facilitate this, POX has a library for parsing and constructing packets. The library has support for a number of different packet types.
Most packets have some sort of a header and some sort of a payload. A payload is often another type of packet. For example, in POX one generally works with ethernet packets which often contain ipv4 packets (which often contain tcp packets...). Some of the packet types supported by POX are:
- ethernet
- ARP
- IPv4
- ICMP
- TCP
- UDP
- DHCP
- DNS
- LLDP
- VLAN
All packet classes in POX are found in pox/lib/packet. By convention, you import the POX packet library as:
import pox.lib.packet as pkt
One can navigate the encapsulated packets in two ways: by using the payload attribute of the packet object, or by using its find() method. For example, here is how you could parse an ICMP message using the payload attribute:
def parse_icmp (eth_packet):
  if eth_packet.type == pkt.IP_TYPE:
    ip_packet = eth_packet.payload
    if ip_packet.protocol == pkt.ICMP_PROTOCOL:
      icmp_packet = ip_packet.payload
...
This is probably not the best way to navigate a packet, but it illustrates the structure of packet headers in POX. At each level of encapsulation the packet header values can be obtained. For example, the source ip address of the ip packet above and ICMP sequence number can be obtained as shown:
...
src_ip = ip_packet.srcip
icmp_code = icmp_packet.code
And similarly for other packet headers. Refer to the specific packet code for other headers.
A packet object’s find() method can be used to find a specific encapsulated packet by the desired type name (e.g., "icmp") or its class (e.g., pkt.ICMP). If the packet object does not encapsulate a packet of the requested type, find() returns None. For example:
def handle_IP_packet (packet):
  ip = packet.find('ipv4')
  if ip is None:
    # This packet isn't IP!
    return
  print "Source IP:", ip.srcip
The following sections detail some of the useful attributes/methods/constants for some of the supported packet types.
Ethernet (ethernet)
Attributes:
- dst (EthAddr)
- src (EthAddr)
- type (int) - The ethertype or ethernet length field. This will be 0x8100 for frames with VLAN tags
- effective_ethertype (int) - The ethertype or ethernet length field. For frames with VLAN tags, this will be the type referenced in the VLAN header.
Constants:
- IP_TYPE, ARP_TYPE, RARP_TYPE, VLAN_TYPE, LLDP_TYPE, JUMBO_TYPE, QINQ_TYPE - A variety of ethertypes
Pretty-print ethertype as string:
pkt.ETHERNET.ethernet.getNameForType(packet.type)
IP version 4 (ipv4)
Attributes:
- srcip (IPAddr)
- dstip (IPAddr)
- tos (int) - 8 bits of Type Of Service / DSCP+ECN
- id (int) - identification field
- flags (int)
- frag (int) - fragment offset
- ttl (int)
- protocol (int) - IP protocol number of payload
- csum (int) - checksum
Constants:
- ICMP_PROTOCOL, TCP_PROTOCOL, UDP_PROTOCOL - Various IP protocol numbers
- DF_FLAG - Don’t Fragment flag bit
- MF_FLAG - More Fragments flag bit
TCP (tcp)
Attributes:
- srcport (int) - Source TCP port number
- dstport (int) - Destination TCP port number
- seq (int) - Sequence number
- ack (int) - ACK number
- off (int) - offset
- flags (int) - Flags as bitfield (easier to use all-uppercase flag attributes)
- csum (int) - Checksum
- options (list of tcp_opt objects)
- win (int) - window size
- urg (int) - urgent pointer
- FIN (bool) - True when FIN flag set
- SYN (bool) - True when SYN flag set
- RST (bool) - True when RST flag set
- PSH (bool) - True when PSH flag set
- ACK (bool) - True when ACK flag set
- URG (bool) - True when URG flag set
- ECN (bool) - True when ECN flag set
- CWR (bool) - True when CWR flag set
Constants:
- FIN_flag, SYN_flag, etc. - Bits corresponding to flags
tcp_opt class
Attributes:
- type (int) - TCP Option ID (probably corresponding constant below)
- val (varies) - Option value
Constants:
- EOL, NOP, MSS, WSOPT, SACKPERM, SACK, TSOPT - Option type IDs
Example: ARP messages
You might want the controller to proxy the ARP replies rather than flood them all over the network depending on whether you know the MAC address of the machine the ARP request is looking for. To handle ARP packets in you should have an event listener set up to receive packet ins as shown:
def _handle_PacketIn (self, event):
  packet = event.parsed
  if packet.type == packet.ARP_TYPE:
    if packet.payload.opcode == arp.REQUEST:
      arp_reply = arp()
      arp_reply.hwsrc = <requested mac address>
      arp_reply.hwdst = packet.src
      arp_reply.opcode = arp.REPLY
      arp_reply.protosrc = <IP of requested mac-associated machine>
      arp_reply.protodst = packet.payload.protosrc
      ether = ethernet()
      ether.type = ethernet.ARP_TYPE
      ether.dst = packet.src
      ether.src = <requested mac address>
      ether.payload = arp_reply
      #send this packet to the switch
      #see section below on this topic
    elif packet.payload.opcode == arp.REPLY:
      print "It's a reply; do something cool"
    else:
      print "Some other ARP opcode, probably do something smart here"
See the l3_learning component for a more complete example of using the controller to parse ARP requests and generate replies.
Constructing Packets from Scratch and Reading Packets from the Wire
The above examples have mostly focused on working with the packet objects. While those are convenient for working with in Python, they’re not the form packets actually take when they’re being sent or received over a network – at that level, the packets are all really just a sequence of bytes.
To go from a packet object (which possibly contains other packet objects as its payload) to its on-the-wire format (a series of bytes), you call the object’s .pack() method. To do the inverse, you call the appropriate packet type’s .unpack() class method. If you’re working with PacketIn objects, this is done for you automatically – the event’s .parsed property will contain the packet objects. However, there are cases where you’ll want to do it yourself. For example, if you are reading from the file descriptor side of a TUN interface, you may want to parse out the IP packets you read. In this case, you’d use pkt.ipv4.unpack(<your data>).
You also may need to manually unpack things when you’ve got cases the packet library doesn’t understand. For example, the packet library understands that an IPv4 packet might contain ICMP or TCP (and a few others). As of this writing, it does not understand either flavor of IP-in-IP encapsulation (protocol 4 or protocol 94). When the packet library doesn’t understand how to parse a packet’s payload, it simply includes it as raw bytes. Thus, IP-in-IP comes out of the packet library as something like ethernet->ipv4->raw_data. If you want work with the encapsulated IPv4 packet, you’ll have to unpack it yourself: inner_ip = pkt.ipv4.unpack(outer_eth.find(‘ipv4’).payload).
Threads, Tasks, and Timers: pox.lib.recoco
This is a big subject, and a lot could be said. Feel free to add something!
POX’s recoco library is for implementing simple cooperative tasks. Perhaps the major benefit of cooperative tasks is that you generally don’t need to worry much about synchronization between them.
There’s a small amount of example material in pox/lib/recoco/examples.py
The first rule of recoco tasks: don’t block. Stalling a recoco task (that is, stalling the scheduler’s thread) will keep other tasks from running. Some blocking operations (sleep, select, etc.) have recoco-friendly equivalents – see recoco’s source or reference for details.
Using Normal Threads
You can use recoco, but you don’t have to – you can use normal threading if you want. Indeed, there are several parts of POX which use normal threads (the web server, for example). While you don’t need to worry much about synchronization between recoco tasks, you do need to think about synchronization between recoco task and normal threads. Often, it’s reasonable to start up a worker thread, and when it’s done, have it fire a method using core.callLater() or have it schedule a recoco Task (using the threadsafe non-fast scheduling function).
Executing Code in the Future using a Timer
It’s often useful to have a piece of code execute from time to time. For example, you may want to examine the bytes transferred over a specific flow every 10 seconds. It’s also a fairly common case where you know you want something to happen at some specific time in the future; for example, if you send a barrier, you might want to disconnect the switch if 5 seconds go by without the barrier reply showing up. This is the type of task that the pox.lib.recoco.Timer class is designed to handle – executing a piece of code at a single or recurring time in the future.
Note: The POX core object’s callDelayed() is often an easier way to set a simple timer. (See example below.)
Timer Constructor Arguments
| arg | type - default | meaning |
|---|---|---|
| _timeToWake_ | number (seconds) | Amount of time to wait before calling callback (absoluteTime = False), or specific time to call callback (absoluteTime = True) |
| _callback_ | callable (e.g., function) | A function to call when the timer elapses |
| _absoluteTime_ | boolean - False | When False, timeToWake is a number of seconds in the future. When True, timeToWake is a specific time in the future (e.g., a number of seconds since the epoch, as reported with time.time()). Note that absoluteTime=True can not be used with recurring timers. |
| _recurring_ | boolean - False | When False, the timer online fires once - timeToWake seconds from when it’s started. When True, the timer fires every timeToWake seconds. |
| _args_, _kw_ | sequence, dict - empty | These are arguments and keyword arguments passed to _callback_. |
| _scheduler_ | Scheduler - None | The scheduler this timer is executed with. None means to use the default (you want this). |
| _started_ | boolean - True | If True, the timer is started automatically. |
| _selfStoppable_ | boolean - True | If True, the callback of a recurring timer can return False to cancel the timer. |
Timer Methods
| name | arguments | meaning |
|---|---|---|
| cancel | None | Stop the timer (do not call the callback again) |
Example - One-Shot timer
from pox.lib.recoco import Timer

def handle_timer_elapse (message):
  print "I was told to tell you:", message

Timer(10, handle_timer_elapse, args = ["Hello"])

# Prints out "I was told to tell you: Hello" in 10 seconds

# Alternate way for simple timers:
from pox.core import core # Many components already do this
core.callDelayed(10, handler_timer_elapse, "Hello") # You can just tack on args and kwargs.
Example - Recurring timer
# Simulate a long road trip

from pox.lib.recoco import Timer

we_are_there = False

def are_we_there_yet ():
  if we_are_there: return False # Cancels timer (see selfStoppable)
  print "Are we there yet?"

Timer(30, are_we_there_yet, recurring = True)
Working with sockets: ioworker
pox.lib.ioworker contains a high level API for working with asynchronous sockets in POX. Sends are fire-and-forget, received data is buffered and a callback fired when there’s some available, etc.
Todo
Documentation and samples
Working with pcap/libpcap: pxpcap
pxpcap is POX’s pcap library. It was written because we couldn’t find an existing pcap library for Python which provided all of the following:
- was maintained
- supported Windows, Linux, and MacOS
- supported both capture and injection
- could capture at a reasonable rate
Along with meeting these goals, pxpcap exposes other pcap and pcap-related functionality, such as enumerating network interfaces, and reading/writing tcpdump/pcap trace files.
The pxpcap directory also contains a couple small utility POX components which can serve as examples if you want to write your own code using pxpcap. The most obvious of these could be called “pxshark” – it captures traffic from an interface, dissects it using the POX packet library, and dumps the results. You can run this like so:
./pox.py pox.lib.pxpcap --interface=eth0
Building pxpcap
pxpcap is written partially in C++ and partially in Python. If you wish to use all of its features, you must build the C++ portion (the pure Python parts should work regardless). Its directory has scripts to make it on Windows, Mac OS, and Linux. It requires that you have a C++ compiler and libpcap/winpcap development files installed. Beyond that, building it should be fairly straightforward; something like the following:
cd pox/lib/pxpcap/pxpcap_c
./build_linux # or ./build_mac or build_win.bat
See the following subsections for tips on specific troublesome configurations.
Note that the setuptools script was originally intended to allow pxpcap to be used either with out without the rest of POX. However, keeping it usable without POX has not been a high priority. Feel free to pitch in here!
Also note that the C portion is required for the POX datapath (software switch) to forward traffic on real interfaces.
Using pxpcap with older versions of Python
pxpcap has a mode where it uses Python’s bytearray C API, which is relatively new (meaning not particularly new at all). If you’re running on recent Python 2.7 (the recommended configuration for POX), this will certainly not be a problem. If you are trying to use pxpcap with some old Python, you can disable the bytearray mode by passing -DNO_BYTEARRAYS to the compiler. This isn’t currently very well supported and you’ll probably need to tweak the setuptools script yourself.
Using pxpcap with PyPy
If you’re using the normal CPython interpreter, you can safely ignore this section. If you’re using PyPy, the good news is that pxpcap can be made to work (at least for PyPy 1.9+). The bad news is that the build scripts are questionable. On Mac OS, the setuptools script seems to build it okay, though the simple install script doesn’t work right since PyPy names its extensions differently, and you’ll have to copy the .so to the pxpcap directory yourself (or you could try installing it globally). On Linux, my (Murphy’s) experience is that the setuptools script doesn’t even work right. I just built it by hand (adjust the output name in the following if you’re not using PyPy 2.1):
g++ pxpcap.cpp -I /home/pox/pypy/include/ -DNO_BYTEARRAYS -DHAVE_PCAP_GET_SELECTABLE_FD -lpcap -shared -fPIC -o ../pxpcap.pypy-21.so
The other caveat is that pxpcap’s bytearray mode (where captured data is put into a bytearray instead of a bytes object) is not supported in PyPy, and you get bytes instead of a bytearray no matter what you do.
OpenFlow in POX
One of the primary purposes for using POX is for developing OpenFlow control applications – that is, where POX acts as a controller for an OpenFlow switch (or, in more proper terminology, an OpenFlow datapath). In this chapter, we describe some of the POX features and interfaces that facilitate this, beginning with a quick overview of some of the major pieces.
Because POX is so often used with OpenFlow, there is a special demand-loading mechanism, which will usually detect when you’re trying to use OpenFlow, and load up OpenFlow-related components with default values. See the “About the OpenFlow Component’s Initialization” subsection for more information on this. If the demand loading doesn’t detect that you’re trying to use it, you can either tweak your component to make it clear that you are (simply accessing core.openflow in your launch function should do it), or simply specify the “openflow” component at the start of the commandline.
A main part of the POX OpenFlow API is the OpenFlow “nexus” object. Usually, there is a single such object which is registered as core.openflow as part of the demand-loading process mentioned above. Some usage of this nexus object is explored in following subsections, including one subsection dedicated entirely to it.
The POX component that actually communicates with OpenFlow switches is openflow.of_01 (the 01 refers to the fact that this component speaks OpenFlow wire protocol 0x01). Again, the demand-loading feature will usually cause this component to be initialized with default values (listening on port 6633). However, you can invoke it automatically instead to either change the options, or because you want to run it multiple times (e.g., to listen on plain TCP and SSL or on multiple ports). See the documentation for the of_01 component for further details.
DPIDs in POX
Before we truly begin discussing the details of communicating with OpenFlow datapath, we should discuss the subject of DPIDs. The OpenFlow specification specifies that datapaths (switches) each have a unique datapath ID or DPID, which is a 64 bit value, and is communicated from the switch to the controller during handshaking by way of the ofp_switch_features message. It puts forth that 48 of those bits are intended to be an Ethernet address and that 16 are “implementer-defined” (in practice, they are very often just zero). Since an OpenFlow switch is itself (mostly) “transparent” to the network, it’s not entirely clear exactly which Ethernet address is supposed to be in those bits, but we can assume it’s something switch-specific. Since OpenFlow Connection objects (discussed below) are tied to a specific switch, the DPID is available on the Connection object using the .dpid attribute. Additionally, the corresponding Ethernet address is available using the .eth_addr attribute.
POX internally treats the DPIDs as Python integer types. This isn’t that nice for humans, though. If you print them out they’re just a decimal number which may not be easy to look at or easy to correlated with the associated Ethernet address. Therefore, POX defines a specific way of formatting DPIDs, which is implemented in pox.lib.util.dpid_to_str(). When passed a DPID in the common case that the 16 “implementer-defined” bits are zeros, the result is a string which looks very much like an Ethernet address except that instead of colons separating the bytes (as POX always does for Ethernet addresses), dashes are used instead. If the implementer-defined bits are nonzero, they are treated as a decimal number and appended following a bar, e.g., “00-00-00-00-00-05|123”. The second parameter of dpid_to_str() allows you to force that the long format always be used. That is, it defaults to False, but if you pass in True, the 16 extra bits are shown even when they’re zero. There is also a corresponding str_to_dpid() function which attempts to parse strings as DPIDs (returning an integer/long).
DPIDs in Mininet
Although this isn’t specific to POX, it is worth saying a few words about DPIDs in Mininet. By default, Mininet assigns DPIDs to switches in a straighforward way. If a switch is “s3”, then its DPID will be 3. This can be problematic when used with the --mac option. The --mac option assigns MAC addresses to hosts in much the same way – if a host is “h3” then its MAC will be 00:00:00:00:00:03. While this can be helpful, it also means that the portion of the DPID which the OpenFlow specification says is intended to be a MAC address is the same as the MAC address of one of the hosts. This can be a source of confusion and problems since MACs are generally assumed to be unique.
Some POX components make a particular OpenFlow switch act like something besides a transparent L2 switch. For example, arp_responder makes an OpenFlow switch act a tiny bit more like a router. Routers have Ethernet addresses, so... which Ethernet address should arp_responder use? There are lots of answers here, but one reasonable one is to use the one that’s embedded in the DPID (and available on the Connection‘s, .eth_addr attribute). As you can see, this has the potential to cause address conflicts when using Mininet’s --mac option. There are ways around this type of situation, but it’s helpful to be aware of the issue.
Communicating with Datapaths (Switches)
Switches connect to POX, and then you obviously want to communicate with those switches from POX. This communication might go either from the controller to a switch, or from a switch to the controller. When communication is from the controller to the switch, this is performed by controller code which sends an OpenFlow message to a particular switch (more on this in a moment). When messages are coming from the switch, they show up in POX as events for which you can write event handlers – generally there’s an event type corresponding to each message type that a switch might send. While the messages themselves are described in the OpenFlow specification and the events are described in following subsections, this subsection focuses simply on how exactly you send those messages and how you set up those event handlers.
There are essentially two ways you can communicate with a datapath in POX: via a Connection object for that particular datapath or via an OpenFlow Nexus which is managing that datapath. There is one Connection object for each datapath connected to POX, and there is typically one OpenFlow Nexus that manages all connections. In the normal configuration, there is a single OpenFlow nexus which is available as core.openflow. There is a lot of overlap between Connections and the Nexus. Either one can be used to send a message to a switch, and most events are raised on both. Sometimes it’s more convenient to use one or the other. If your application is interested in events from all switches, it may make sense to listen to the Nexus, which raises events for all switches. If you’re interested only in a single switch, it may make sense to listen to the specific Connection.
Connection Objects
Every time a switch connects to POX, there is also an associated Connection object. If your code has a reference to that Connection object, you can use its send() method to send messages to the datapath.
Connection objects, along with being able to send commands to switches and being sources of events from switches, have a number of other useful attributes. We list some here (for more, view the reference for the Connection class):
| member | description |
|---|---|
ofnexus |
A reference to the nexus object associated with this connection. (Usually this is the same as core.openflow.) |
dpid |
The datapath identifier of the switch. (See the next section for more details.) |
features |
The switch features reply (ofp_switch_features) sent by the switch during handshaking. |
ports |
The ports on the switch. As these may change during the lifetime of a connection, POX attempts to track such changes. However, there is always the possibility that these are out of date (hopefully only transiently). This attribute is a reference to a special PortCollection object. This object is sort of like a dictionary where values are ofp_phy_port objects and the keys are flexible – you can look up ports by their OpenFlow port number (ofp_phy_port‘s .port_no), their Ethernet address (ofp_phy_port‘s .hw_addr), or their port name (ofp_phy_port‘s .name, e.g., “eth0”). |
sock |
The socket connecting to the peer. This is a Python socket object, so you can, e.g., retrieve the address of the switch’s side of the connection using connection.sock.getpeername(). |
send(msg) |
A method used to send an OpenFlow message to the switch. |
In addition to its attributes and the send() method, Connection objects raise events corresponding to particular datapaths, for example when a datapath disconnects or sends a notification (for more on events in general, see the section “The Event System”). You can create handlers for events on a particular datapath by registering event listeners on the associated Connection. You can find examples of this later in this section.
Getting a Reference to a Connection Object
If you wish to use any of the above-mentioned attributes of a Connection object, you – of course – need a reference to the Connection object associated with the datapath you’re interested in. There are three major ways to get such a reference to a Connection object:
- You can listen to
ConnectionUpevents on the nexus – these pass the newConnectionobject along - You can use the nexus’s
getConnection(<DPID>)method to find a connection by the switch’s DPID (see the next section) - You can enumerate all of the nexus’s connections via its
connectionsproperty (e.g.,for con in core.openflow.connections) (see the next section)
As an example of the first, you may have code in your own component class which tracks connections and stores references to them itself. It does this by listening to the ConnectionUp event on the OpenFlow nexus. This event includes a reference to the new connection, which is added to its own set of connections. The following code demonstrates this (note that a more complete implementation would also want to use the ConnectionDown event to remove Connections from the set!).
class MyComponent (object):
    def __init__ (self):
        self.connections = set()
        core.openflow.addListeners(self)

    def _handle_ConnectionUp (self, event):
        self.connections.add(event.connection) # See ConnectionUp event documentation
The OpenFlow Nexus – core.openflow
An OpenFlow nexus is essentially a manager for a set of OpenFlow Connections. Typically, there is a single nexus which manages connections to all switches, and this is available as core.openflow. (The advanced topic of creating multiple nexus objects and assigning particular connections to each one via a connection arbiter object is an advanced topic for very particular use cases and is not currently covered in this manual.)
Here we list some attributes of a nexus:
| attribute | description |
|---|---|
miss_send_len |
When a packet does not match any table entry on a datapath, the datapath will forward the packet to the controller inside a packet-in message. To conserve bandwidth, the datapath will actually not send the entire packet, but only the first miss_send_len bytes. By adjusting this value here, any datapaths which subsequently connect will be configured to only send this number of bytes. This defaults to OFP_DEFAULT_MISS_SEND_LEN from the OpenFlow specification (128 bytes). |
clear_flows_of_connect |
When True (the default), POX will delete all flows on the first table of a switch when it connects. |
connections |
A special collection (see below) containing references to all connections this nexus is handling. |
getConnection(<dpid>) |
Get a connection object for a particular datapath via its DPID or None if not available. |
sendToDPID(<dpid>,<msg>) |
Send an OpenFlow message to a particular datapath, dropping the message (and logging a warning) if the datapath isn’t connected. (Similar to doing core.openflow.getConnection(dpid).send(msg)). |
The connections collection is essentially a dictionary where the keys are DPIDs and the values are Connection objects. However, if you iterate this, it iterates the Connections and not the DPIDs, unlike a normal dictionary. To iterate the DPIDs, you can use the .iter_dpids() method. Additionally, you can use the “in” operator to check for whether a Connection is in this collection as well as whether a DPID is in the collection, and there is a .dpids() attribute which is really the same as .keys().
As with Connection objects, you can also set event listeners on the nexus object itself. Whereas a Connection object only raises events pertaining to the datapath associated with that particular Connection, the nexus object raises events relevant to any of the Connections it’s managing. We dig in to these events in the next subsection.
Todo
Add notes on order of events between nexus and Connection, halting events, etc.
OpenFlow Events: Responding to Switches
_Note: For more background on the event system in POX, see the relevant section in this manual._
Most OpenFlow related events are raised in direct response to a message received from a switch. As a general guideline, OpenFlow related events have the following three attributes:
| attribute | type | description |
|---|---|---|
| connection | Connection | Connection to the relevant switch (e.g., which sent the message this event corresponds to). |
| dpid | long | Datapath ID of relevant switch (use dpid_to_str() to format it for display). |
| ofp | ofp_header subclass | OpenFlow message object that caused this event. See OpenFlow Messages for info on these objects. |
In the rest of this section, we describe some of the events provided by the OpenFlow module and topology module. To get you started, here’s a very simple POX component that listens to ConnectionUp events from all switches, and logs a message when one occurs. You can put this into a file (e.g., ext/connection_watcher.py) and then run it (with ./pox.py connection_watcher) and watch switches connect.
from pox.core import core
from pox.lib.util import dpid_to_str

log = core.getLogger()

class MyComponent (object):
  def __init__ (self):
    core.openflow.addListeners(self)

  def _handle_ConnectionUp (self, event):
    log.debug("Switch %s has come up.", dpid_to_str(event.dpid))

def launch ():
  core.registerNew(MyComponent)
ConnectionUp
Unlike most other OpenFlow events, this message is not raised in response to reception of a specific OpenFlow message from a switch – it’s simply fired in response to the establishment of a new control channel with a switch.
Also note that while most OpenFlow events are raised on both the Connection itself and on the OpenFlow nexus, the ConnectionUp event is raised only on the nexus. This makes sense since the ConnectionUp event is the first sign that a Connection exists – nobody could have possibly set a listener on it yet!
Additional attribute information (in addition to the standard OpenFlow event attributes):
| attribute | type | notes |
|---|---|---|
| ofp | ofp_switch_features | Contains information about the switch, for example supported action types (e.g., whether field rewriting is available), and port information (e.g., MAC addresses and names). (This is also available on the Connection’s features attribute.) |
This event can be handled as shown below:
def _handle_ConnectionUp (self, event):
  print "Switch %s has come up." % event.dpid
ConnectionDown
Similar to ConnectionUp but unlike most other OpenFlow-related events, this event is not fired in response to an actual OpenFlow message. It is simply fired when a connection to a switch has been terminated (either because it has been closed explicitly, because the switch was restarted, etc.).
Note that unlike ConnectionUp, this event is raised on both the nexus and the Connection itself.
Note that this event has no .ofp attribute.
PortStatus
PortStatus events are raised when the controller receives an OpenFlow port-status message (ofp_port_status) from a switch, which indicates that ports have changed. Thus, its .ofp attribute is an ofp_port_status.
class PortStatus (Event):
  def __init__ (self, connection, ofp):
    Event.__init__(self)
    self.connection = connection
    self.dpid = connection.dpid
    self.ofp = ofp
    self.modified = ofp.reason == of.OFPPR_MODIFY
    self.added = ofp.reason == of.OFPPR_ADD
    self.deleted = ofp.reason == of.OFPPR_DELETE
    self.port = ofp.desc.port_no
A quick example:
def _handle_PortStatus (self, event):
  if event.added:
    action = "added"
  elif event.deleted:
    action = "removed"
  else:
    action = "modified"
  print "Port %s on Switch %s has been %s." % (event.port, event.dpid, action)
FlowRemoved
FlowRemoved events are raised when the controller receives an OpenFlow flow-removed message (ofp_flow_removed) from a switch, which are sent when a table entry is removed on the switch either due to a timeout or explicit deletion. Such notifications are sent only when the flow was installed with the OFPFF_SEND_FLOW_REM flag set. See the OpenFlow specification for further details.
While you can, as usual, access the ofp_flow_removed directly via the event’s .ofp attribute, the event has several attributes for convenience:
| attribute | type | meaning |
|---|---|---|
| idleTimeout | bool | True if entry was removed due to idleness |
| hardTimeout | bool | True if entry was removed due to a hard timeout |
| timeout | bool | True if entry was removed due to any timeout |
| deleted | bool | True if entry was explicitly deleted |
Statistics Events
Statistics events are raised when the controller receives an OpenFlow statistics reply message (ofp_stats_reply / OFPT_STATS_REPLY) from a switch, which is sent in response to a statistics request sent by the controller.
There are a number of statistics events. The most basic is RawStatsReply which is simply fired in response to an ofp_stats_reply message from the switch. However, this message (and therefore the associated event) is not particularly convenient, as it’s up to the user to determine what type of statistics event it is, and possibly to “glue back together” multi-part statistics replies.
To remedy this, POX includes separate events for each statistics reply type, and these events are fired when the entire response (including possible multiple parts) have been received. If none of this makes any sense to you because you haven’t read the OpenFlow specification thoroughly – that’s fine. The short of it is that you should just handle the event for the specific stats type that you’re interested in. These include:
| Event | OpenFlow Stats Type |
|---|---|
SwitchDescReceived |
ofp_desc_stats |
FlowStatsReceived |
ofp_flow_stats |
AggregateFlowStatsReceived |
ofp_aggregate_stats_reply |
TableStatsReceived |
ofp_table_stats |
PortStatsReceived |
ofp_port_stats |
QueueStatsReceived |
ofp_queue_stats |
Underneath, each of these events is a subclass of the StatsReply superclass. When handling these StatsReply-based events, the .stats attribute will contain a complete set of statistics (e.g., an array of ofp_flow_stats `for:mono: FlowStatsReceived`). See the section on ofp_stats_request for more information. More specifically, note the following information for all StatsReply subclasses:
| attribute | meaning |
|---|---|
ofp |
Because a StatsReply may have glued together multiple individual OpenFlow messages, the .ofp attribute is a _list_ of ofp_stats_reply messages. (In the typical case, however, the list has a single entry.) |
stats |
All of the individual stats bodies in a single list. |
PacketIn
Fired when the controller receives an OpenFlow packet-in message (ofp_packet_in / OFPT_PACKET_IN) from a switch, which indicates that a packet arriving at a switch port has either failed to match all entries in the table, or the matching entry included an action specifying to send the packet to the controller.
In addition to the usual OpenFlow event attributes:
- port (int) - number of port the packet came in on
- data (bytes) - raw packet data
- parsed (packet subclasses) - pox.lib.packet’s parsed version
- ofp (ofp_packet_in) - OpenFlow message which caused this event
ErrorIn
Fired when the controller receives an OpenFlow error (ofp_error_msg / OFPT_ERROR_MSG) from a switch.
In addition to the usual OpenFlow event attributes:
| attribute | meaning |
|---|---|
| should_log | Usually, an OpenFlow error results in a log message. If you handle the ErrorIn event, you may set this attribute to False to silence the default log message. |
| asString() | Formats this error as a string. |
BarrierIn
Fired when the controller receives an OpenFlow barrier reply (OFPT_BARRIER_REPLY) from a switch, which indicates that the switch has finished processing commands sent by the controller prior to the corresponding barrier request.
In addition to the usual attributes for OpenFlow events, the BarrierIn event contains:
| attribute | type | description |
|---|---|---|
| xid | integer | Transaction ID. For events which are responses to commands sent by the controller, this will contain the same value as the .xid of the command. For instance, a BarrierIn‘s .xid will be the same value as was used in the ofp_barrier_request message. |
OpenFlow Messages
OpenFlow messages are how OpenFlow switches communicate with controllers. The messages are defined in the OpenFlow Specification. There are multiple versions of the specification; POX currently supports OpenFlow version 1.0.0 (wire protocol version 0x01).
POX contains classes and constants corresponding to elements of the OpenFlow protocol, and these are defined in the file pox/openflow/libopenflow_01.py (the 01 referring to the wire protocol version). For the most part, the names are the same as they are in the specification. In a few instances, POX has names which we think are better. Additionally, POX defines some classes do not correspond to specific structures in the specification (the specification does not describe structs which are just a plain OpenFlow header only differentiated by the message type attribute – POX does). Thus, you may well wish to refer to the OpenFlow Specification itself in addition to this document (and, of course, the POX code and pydoc/Sphinx reference).
A nice aspect of POX’s OpenFlow library is that many fields have useful default values or can infer values.
In the following subsections, we will discuss a useful subset of POX’s OpenFlow interface.
Todo
Redo following sections to have tables of values/types/descriptions rather than snippets from init functions.
ofp_packet_out - Sending packets from the switch
The main purpose of this message is to instruct a switch to send a packet (or enqueue it). However it can also be useful as a way to instruct a switch to discard a buffered packet (by simply not specifying any actions).
| attribute | type | default | notes |
|---|---|---|---|
| buffer_id | int/None | None | ID of the buffer in which the packet is stored at the datapath. If you’re not resending a buffer by ID, use None. |
| in_port | int | OFPP_NONE | Switch port that the packet arrived on if resending a packet. |
| actions | list of ofp_action_XXXX | [ ] | If you have a single item, you can also specify this using the named parameter “action” of the initializer. |
| data | bytes / ethernet / ofp_packet_in | ‘’ | The data to be sent (or None if sending an existing buffer via its buffer_id). If you specify an ofp_packet_in for this, in_port, buffer_id, and data will all be set correctly – this is the easiest way to resend a packet. |
Note
If you receive an ofp_packet_in and wish to resend it, you can simply use it as the data attribute.
See section of 5.3.6 of OpenFlow 1.0 spec. This class is defined in pox/openflow/libopenflow_01.py.
ofp_flow_mod - Flow table modification
class ofp_flow_mod (ofp_header):
  def __init__ (self, **kw):
    ofp_header.__init__(self)
    self.header_type = OFPT_FLOW_MOD
    if 'match' in kw:
      self.match = None
    else:
      self.match = ofp_match()
    self.cookie = 0
    self.command = OFPFC_ADD
    self.idle_timeout = OFP_FLOW_PERMANENT
    self.hard_timeout = OFP_FLOW_PERMANENT
    self.priority = OFP_DEFAULT_PRIORITY
    self.buffer_id = None
    self.out_port = OFPP_NONE
    self.flags = 0
    self.actions = []
- cookie (int) - identifier for this flow rule. (optional)
- command (int) - One of the following values:
- OFPFC_ADD - add a rule to the datapath (default)
- OFPFC_MODIFY - modify any matching rules
- OFPFC_MODIFY_STRICT - modify rules which strictly match wildcard values.
- OFPFC_DELETE - delete any matching rules
- OFPFC_DELETE_STRICT - delete rules which strictly match wildcard values.
- idle_timeout (int) - rule will expire if it is not matched in ‘idle_timeout’ seconds. A value of OFP_FLOW_PERMANENT means there is no idle_timeout (the default).
- hard_timeout (int) - rule will expire after ‘hard_timeout’ seconds. A value of OFP_FLOW_PERMANENT means it will never expire (the default)
- priority (int) - the priority at which a rule will match, higher numbers higher priority. Note: Exact matches will have highest priority.
- buffer_id (int) - A buffer on the datapath that the new flow will be applied to. Use None for none. Not meaningful for flow deletion.
- out_port (int) - This field is used to match for DELETE commands.OFPP_NONE may be used to indicate that there is no restriction.
- flags (int) - Integer bitfield in which the following flag bits may be set:
- OFPFF_SEND_FLOW_REM - Send flow removed message to the controller when rule expires
- OFPFF_CHECK_OVERLAP - Check for overlapping entries when installing. If one exists, then an error is send to controller
- OFPFF_EMERG - Consider this flow as an emergency flow and only use it when the switch controller connection is down.
- actions (list) - actions are defined below, each desired action object is then appended to this list and they are executed in order.
- match (ofp_match) - the match structure for the rule to match on (see below).
See section of 5.3.3 of OpenFlow 1.0 spec. This class is defined in pox/openflow/libopenflow_01.py.
Example: Installing a table entry
# Traffic to 192.168.101.101:80 should be sent out switch port 4

# One thing at a time...
msg = of.ofp_flow_mod()
msg.priority = 42
msg.match.dl_type = 0x800
msg.match.nw_dst = IPAddr("192.168.101.101")
msg.match.tp_dst = 80
msg.actions.append(of.ofp_action_output(port = 4))
self.connection.send(msg)

# Same exact thing, but in a single line...
self.connection.send( of.ofp_flow_mod( action=of.ofp_action_output( port=4 ),
                                       priority=42,
                                       match=of.ofp_match( dl_type=0x800,
                                                           nw_dst="192.168.101.101",
                                                           tp_dst=80 )))
Example: Clearing tables on all switches
# create ofp_flow_mod message to delete all flows
# (note that flow_mods match all flows by default)
msg = of.ofp_flow_mod(command=of.OFPFC_DELETE)

# iterate over all connected switches and delete all their flows
for connection in core.openflow.connections: # _connections.values() before betta
  connection.send(msg)
  log.debug("Clearing all flows from %s." % (dpidToStr(connection.dpid),))
ofp_stats_request - Requesting statistics from switches
class ofp_stats_request (ofp_header):
  def __init__ (self, **kw):
    ofp_header.__init__(self)
    self.header_type = OFPT_STATS_REQUEST
    self.type = None # Try to guess
    self.flags = 0
    self.body = b''
- type (int) - The type of stats request (e.g., OFPST_PORT). Default is to try to guess based on body.
- flags (int) - No flags are defined in OpenFlow 1.0.
- body (flexible) - The body of the stats request. This can be a raw bytes object, or a packable class (e.g., ofp_port_stats_request).
See section of 5.3.5 of OpenFlow 1.0 spec for more info on this structure and on the individual statistics types (port stats, flow stats, aggregate flow stats, table stats, etc.). This class is defined in pox/openflow/libopenflow_01.py
Todo
Show some of the individual stats request/reply types?
Example - Web Flow Statistics
Request the flow table from a switch and dump info about web traffic. This example is meant to be run along with, say, the forwarding.l2_learning component. It can be pasted into the POX interactive interpreter (if you run POX including the py component). There is also an extended version of this example meant to run as a component in the Third Party section – the “Statistics Collector Example”.
See the Statistics Events section for more info.
1 2 3 4 5 6 7 8 9 10 11 12 13 14 15 16 17 18 19 | import pox.openflow.libopenflow_01 as of
log = core.getLogger("WebStats")
# When we get flow stats, print stuff out
def handle_flow_stats (event):
web_bytes = 0
web_flows = 0
for f in event.stats:
if f.match.tp_dst == 80 or f.match.tp_src == 80:
web_bytes += f.byte_count
web_flows += 1
log.info("Web traffic: %s bytes over %s flows", web_bytes, web_flows)
# Listen for flow stats
core.openflow.addListenerByName("FlowStatsReceived", handle_flow_stats)
# Now actually request flow stats from all switches
for con in core.openflow.connections: # make this _connections.keys() for pre-betta
con.send(of.ofp_stats_request(body=of.ofp_flow_stats_request()))
|
Match Structure
OpenFlow defines a match structure – ofp_match – which enables you to define a set of headers for packets to match against. You can either build a match from scratch, or use a factory method to create one based on an existing packet.
The match structure is defined in pox/openflow/libopenflow_01.py in class ofp_match. Its attributes are derived from the members listed in the OpenFlow specification, so refer to that for more information, though they are summarized in the table below.
ofp_match attributes:
| Attribute | Meaning |
|---|---|
| in_port | Switch port number the packet arrived on |
| dl_src | Ethernet source address |
| dl_dst | Ethernet destination address |
| dl_vlan | VLAN ID |
| dl_vlan_pcp | VLAN priority |
| dl_type | Ethertype / length (e.g. 0x0800 = IPv4) |
| nw_tos | IP TOS/DS bits |
| nw_proto | IP protocol (e.g., 6 = TCP) or lower 8 bits of ARP opcode |
| nw_src | IP source address |
| nw_dst | IP destination address |
| tp_src | TCP/UDP source port |
| tp_dst | TCP/UDP destination port |
Attributes may be specified either on a match object or during its initialization. That is, the following are equivalent:
my_match = of.ofp_match(in_port = 5, dl_dst = EthAddr("01:02:03:04:05:06"))
#.. or ..
my_match = of.ofp_match()
my_match.in_port = 5
my_match.dl_dst = EthAddr("01:02:03:04:05:06")
Partial Matches and Wildcards
Unspecified fields are wildcarded and will match any packet. You can explicitly set a field to be wildcarded by setting it to None.
Note
Info: While the OpenFlow ofp_match structure is defined as having a wildcards attribute, you will probably never need to explicitly set it when using POX – simply don’t assign values to fields you want wildcarded (or set them to None).
IP address fields are a bit trickier, as they can be wildcarded completely like the other fields, but can also be partially wildcarded. This allows you to match entire subnets. There are a number of ways to do this. Here are some equivalent ones:
my_match.nw_src = "192.168.42.0/24"
my_match.nw_src = (IPAddr("192.168.42.0"), 24)
my_match.nw_src = "192.168.42.0/255.255.255.0"
my_match.set_nw_src(IPAddr("192.168.42.0"), 24)
In particular, note that the nw_src and nw_dst attributes can be ambiguous when working with partial matches – especially when reading a match structure (e.g., as returned in a flow_removed message or flow_stats reply). To account for this, you may use the unambiguous .get_nw_src(), .set_nw_src(), and the destination equivalents. These return a tuple such as (IPAddr("192.168.42.0"), 24) which includes the number of matched bits – the number that would follow the slash in CIDR-style representation (192.168.42.0/24).
Note that some fields have prerequisites. Basically this means that you can’t specify higher-layer fields without specifying the corresponding lower-layer fields also. For example, you can not create a match on a TCP port without also specifying that you wish to match TCP traffic. And in order to match TCP traffic, you must specify that you wish to match IP traffic. Thus, a match with only tp_dst=80, for example, is invalid. You must also specify nw_proto=6 (TCP), and dl_type=0x800 (IPv4). If you violate this, you should get the warning message ‘Fields ignored due to unspecified prerequisites‘. For more information on this subject, see the FAQ entry “I tried to install a table entry but got a different one. Why?”.
ofp_match Methods
| Method | Description |
|---|---|
| from_packet(packet, in_port=None, spec_frags=False) | Class factory. See “Defining a match from an existing packet” below. |
| clone() | Returns a copy of this ofp_match. |
| flip() | Returns a copy with its source and destinations reversed. |
| show() | Returns a large string representation. |
| get_nw_src() | Returns the IP source address and the number of matched bits as a tuple. For example: (IPAddr(“192.168.42.0”, 24). Note that the first element of the tuple will be None when the second is 0. |
| set_nw_src(IP and bits) | Sets the IP source address and the number of bits to match. The arguments can either be two arguments (one for IP and one for bit count), or a tuple in the format used by get_nw_src(). |
| get_nw_dst() | Same as get_nw_src() but for destination address. |
| set_nw_dst(IP and bits) | Same as set_nw_src() but for destination address. |
Defining a match from an existing packet
There is a simple way to create an exact match based on an existing packet object (that is, an ethernet object from pox.lib.packet) or from an existing ofp_packet_in. This is done using the factory method ofp_match.from_packet().
my_match = ofp_match.from_packet(packet, in_port)
The packet parameter is a parsed packet or ofp_packet_in from which to create the match. As the input port is not actually in a packet header, the resulting match will have the input port wildcarded by default when this method is called with a packet. You can, of course, set the in_port field later yourself, but as a shortcut, you can simply pass it in to from_packet(). When using from_packet() with an ofp_packet_in, the in_port is taken from there by default.
Note that you can set fields of the resultant match object to None (wildcarding them) if you want a less-than-exact match.
from_packet() also has an optional spec_frags argument which defaults to False. See page 9 of the OpenFlow 1.0 specification to help understand the rationale for its existence.
Example: Matching Web Traffic
As an example, the following code will create a match for traffic to web servers:
import pox.openflow.libopenflow_01 as of # POX convention
import pox.lib.packet as pkt # POX convention
my_match = of.ofp_match(dl_type = pkt.ethernet.IP_TYPE, nw_proto = pkt.ipv4.TCP_PROTOCOL, tp_dst = 80)
OpenFlow Actions
OpenFlow actions are applied to packets that match a rule installed at the datapath. The code snippets found here can be found in libopenflow_01.py in pox/openflow.
Output
Forward packets out of a physical or virtual port. Physical ports are referenced to by their integral value, while virtual ports have symbolic names. Physical ports should have port numbers less than 0xFF00.
Structure definition:
class ofp_action_output (object):
  def __init__ (self, **kw):
    self.port = None # Purposely bad -- require specification
- port (int) the output port for this packet. Value could be an actual port number or one of the following virtual ports:
- OFPP_IN_PORT - Send back out the port the packet was received on. Except possibly OFPP_NORMAL, this is the only way to send a packet back out its incoming port.
- OFPP_TABLE - Perform actions specified in flowtable. Note: Only applies to ofp_packet_out messages.
- OFPP_NORMAL - Process via normal L2/L3 legacy switch configuration (if available – switch dependent)
- OFPP_FLOOD - output all openflow ports except the input port and those with flooding disabled via the OFPPC_NO_FLOOD port config bit (generally, this is done for STP)
- OFPP_ALL - output all openflow ports except the in port.
- OFPP_CONTROLLER - Send to the controller.
- OFPP_LOCAL - Output to local openflow port.
- OFPP_NONE - Output to no where.
Enqueue
Forwards a packet through the designated queue to implement rudimentary QoS behavior. See section of 5.2.2 of the OpenFlow spec.
class ofp_action_enqueue (object):
  def __init__ (self, **kw):
    self.port = 0
    self.queue_id = 0
- port (int) - must be a physical port
- queue_id (int) - specific queue id
Note that definition of queues is not a part of OpenFlow and is switch-specific.
Set VLAN ID
If the packet doesn’t have a VLAN header, this adds one and sets its ID to the specified value and its priority to 0. If the packet already has a VLAN header, this just changes its ID.
class ofp_action_vlan_vid (object):
  def __init__ (self, **kw):
    self.vlan_vid = 0
- vlan_vid (int) - the ID to set the vlan id to (< 4094, of course)
Set VLAN priority
If the packet doesn’t have a VLAN header, this adds one and sets its priority to the specified value and its ID to 0. If the packet already has a VLAN header, this just changes its priority.
class ofp_action_vlan_pcp (object):
  def __init__ (self, **kw):
    self.vlan_pcp = 0
- vlan_pcp (short) - the priority to set the packet to (< 8)
Set Ethernet source or destination address
Used to set the source or destination MAC (Ethernet) address.
class ofp_action_dl_addr (object):
  @classmethod
  def set_dst (cls, dl_addr = None):
    return cls(OFPAT_SET_DL_DST, dl_addr)
  @classmethod
  def set_src (cls, dl_addr = None):
    return cls(OFPAT_SET_DL_SRC, dl_addr)

  def __init__ (self, type = None, dl_addr = None):
    self.type = type
    self.dl_addr = EMPTY_ETH
- type (int) - either OFPAT_SET_DL_SRC or OFPAT_SET_DL_DST
- dl_addr (EthAddr) - the mac address to set.
It may be convenient to use the two class factory methods rather than directly creating an instance of this class. For example, to create an action to rewrite the destination MAC address, you can use:
action = ofp_action_dl_addr.set_dst(EthAddr("01:02:03:04:05:06"))
Set IP source or destination address
Used to set the source or destination IP address.
class ofp_action_nw_addr (object):
  @classmethod
  def set_dst (cls, nw_addr = None):
    return cls(OFPAT_SET_NW_DST, nw_addr)
  @classmethod
  def set_src (cls, nw_addr = None):
    return cls(OFPAT_SET_NW_SRC, nw_addr)

  def __init__ (self, type = None, nw_addr = None):
    self.type = type
    if nw_addr is not None:
      self.nw_addr = IPAddr(nw_addr)
    else:
      self.nw_addr = IPAddr(0)
- type (int) - either OFPAT_SET_NW_SRC or OFPAT_SET_NW_DST
- nw_addr (IPAddr) - the IP address to set
As with MAC addresses, rather than constructing an instance of this class directly, it can be convenient to use the set_src() and set_dst() factory methods:
action = ofp_action_nw_addr.set_dst(IPAddr("192.168.1.14"))
Set IP Type of Service
Set the TOS field of an IP packet.
class ofp_action_nw_tos (object):
  def __init__ (self, nw_tos = 0):
    self.nw_tos = nw_tos
- nw_tos (short) - the tos of service to set.
Set TCP/UDP source or destination port
Set the source or desintation TCP or UDP port.
class ofp_action_tp_port (object):
  @classmethod
  def set_dst (cls, tp_port = None):
    return cls(OFPAT_SET_TP_DST, tp_port)
  @classmethod
  def set_src (cls, tp_port = None):
    return cls(OFPAT_SET_TP_SRC, tp_port)

  def __init__ (self, type=None, tp_port = 0):
    self.type = type
    self.tp_port = tp_port
- type (int) - must be either OFPAT_SET_TP_SRC or OFPAT_SET_TP_DST
- tp_port (short) - the port value to set (< 65534)
As with the MAC and IP addresses, it may be convenient to use the two factory methods (set_dst() and set_src()) rather than explicitly creating instances of this class.
Example: Sending a FlowMod
To send a flow mod you must define a match structure (discussed above) and set some flow mod specific parameters as shown here:
msg = ofp_flow_mod()
msg.match = match
msg.idle_timeout = idle_timeout
msg.hard_timeout = hard_timeout
msg.actions.append(of.ofp_action_output(port = port))
msg.buffer_id = <some buffer id, if any>
connection.send(msg)
Using the connection variable obtained when the datapath joined, we can send the flowmod to the switch.
Example: Sending a PacketOut
In a similar manner to a flow mod, one must first define a packet out as shown here:
msg = of.ofp_packet_out(in_port=of.OFPP_NONE)
msg.actions.append(of.ofp_action_output(port = outport))
msg.buffer_id = <some buffer id, if any>
connection.send(msg)
The inport is set to OFPP_NONE because the packet was generated at the controller and did not originate as a packet in at the datapath.
Nicira / Open vSwitch Extensions
Open vSwitch supports a number of extensions to OpenFlow 1.0, and POX has growing support for these through the openflow.nicira module. For example, there’s support for multiple tables, Nicira Extensible Match, a number of the register-based actions, etc.
In general, if you want to use the Nicira extensions, you should put openflow.nicira on your commandline to run it like a component (or import it and call its launch() function directly). You will then probably want to import it to get access to the classes and so forth that it contains. In POX, the current convention is to import it as so: import pox.openflow.nicira as nx (however, this may change for the dart release).
Below, we discuss some aspects of POX’s support for Nicira extensions, but please note that this is quite incomplete. You might find it helpful to refer to the Open vSwitch documentation/source. In particular, the nicira-ext.h header is useful, as is this list of fields used in OVS (which may not be official documentation, but I believe to have been written by one of OVS’ primary authors).
Todo
Reference some of the other helpful OVS files.
Extended PacketIn Messages
OVS has an extended version of the packet-in message which contains the reason for the packet-in (e.g., whether it was because of a send-to-controller action or a table miss) and in the former case, the match of the relevant table entry. This extended version is encapsulated inside an OpenFlow vendor message, and can be read via the generic vendor message hook mechanism or by handling the vendor event. However, you can also have POX repurpose the normal PacketIn event and instead of having its .ofp attribute be a normal ofp_packet_in, it will be an nxt_packet_in instead. To do this, pass the --convert-packet-in argument to the openflow.nicira component on the commandline.
Besides telling POX to treat these extended packet-ins as PacketIn events, you must also turn on the extended packet-in feature on the switches. To do this, send a switch an nx_packet_in_format message. Generally you’ll do this in your ConnectionUp handler, like so:
event.connection.send(nx.nx_packet_in_format())
Multiple Table Support
While OpenFlow 1.0 only supports a single table, the Nicira extensions add support for multiple tables. There are a couple aspects to this extension.
First, when manipulating the flow table, you must specify which table you mean. The original ofp_flow_mod had no way to do this. The extension repurposes eight bits of the sixteen bit “command” field to instead hold the table number. POX’s openflow.nicira includes a new ofp_flow_mod_table_id message type, which does this for you, adding a table_id attribute. The new nx_flow_mod (see the Nicira Extended Match section for more on the latter) also includes this table_id attribute. Note that before using this extended flow_mod, you must enable the extension, by sending an nx_flow_mod_table_id message, similar to with nx_packet_in_format mentioned above.
Additionally, while packets originally enter the first (zeroth) table, there is now an action which lets you send a packet to another table. The easiest way to do this in POX is using a factory method of nx_action_resubmit:
flowmod.actions.append(nx.nx_action_resubmit.resubmit_table(table=42))
Flexible Flow Specifications (AKA Nicira Extended Match)
Nicira Extended Match (or NXM) is one of the more significant Nicira extensions, and is the basis for the OpenFlow Extensible Match (OXM) in OpenFlow 1.2. Among other things, it allows for the matching of IPv6 fields, the flow cookie, metadata registers, and a whole slew of other things.
The core of NXM is the nx_match structure, which replaces the original ofp_match structure as the way to define matches for table entries. Unlike ofp_match, which is just a fixed collection of fields, nx_match is really a flexible container for individual nxm_entry`s. In POX, its basic interface is similar to that of a normal Python list (though it should only contain match entries!). Different types of :mono:`nxm_entry are used to specify the attributes of packets you wish to match, such as addresses, IP protocol number, and so on. There are nxm_entry types corresponding to each of the fixed fields in the original ofp_match, as well as a large number of new types.
Many nxm_entry types support masks. For example, the IP source and destination address matching types (NXM_OF_IP_SRC and NXM_OF_IP_DST) support masks, which allows you to match subnets. Unlike OVS, which only allows CIDR-compatible wildcarding of IP address bits, current versions of OVS allow for matching arbitrary netmasks via NXM. Exactly which fields support masks and exactly which masks are supported is specific to the particular switch. For example, earlier versions of OVS only allowed a few masks for Ethernet addresses, but current versions support arbitrary masks (this is a pattern – newer versions of OVS generally support more flexible masks for more fields).
The naming of the nxm_entry types correspond to their names in Open vSwitch. Most of them start with “NXM_”. The types which correspond to the fixed fields in ofp_match start with “NXM_OF_”. Types which originate from Nicira start with “NXM_NX_”. There are a few exceptions to the NXM_ prefix. As mentioned, NXM is the basis for OXM. Most of the fields supported by OXM are also supported by NXM, and we use the NXM name. However, there are some OXM entries which are supported by Open vSwitch which don’t have an NXM equivalent. For these, the OXM_* name is used and is available in openflow.nicira. This may change in the future when POX actually supports OpenFlow 1.2+ (and therefore has direct support for OXM).
The best way I know to learn about the various nxm_entry types is by reading the sourcecode to nicira-ext.h (and possibly some other files) in Open vSwitch. You can also look for them in POX’s openflow/nicira.py code. See the Additional Information subsection below for links. At one point, POX supported most or all of the ones in OVS, though as OVS evolves, it’s possible that some are added which missing from POX. In general, they’re easy to add yourself, and requests made to the mailing list will probably result in them being added as well.
Since the original ofp_flow_mod is specifically tied to the original ofp_match, the NXM extension also includes a new nx_flow_mod command to actually manipulate table entries that use extended matches.
Many entry types have prerequisites. For example, if you want to match IPv4 addresses, you must first specify that the ethertype of the packet is, in fact, IPv4 (i.e., 0x0800). Order is significant here. As stated above, nx_match‘s basic interface similar to a Python list. When an entry type has a prerequisites, the prerequisite entry must come first. POX currently has no support for supplying these automatically or for checking the order or existence of these: if you screw it up, it’s all on you to figure it out (though it may in the future). Read the documentation on the entry type carefully!
Note
Perequisites have a relationship with OVS’s “normal form”. The man page of OVS’s ovs-ofctl has this to say:
Flow descriptions should be in normal form. This means that a flow may only specify a value for an L3 field if it also specifies a particular L2 protocol, and that a flow may only specify an L4 field if it also specifies particular L2 and L3 protocol types. For example, if the L2 protocol type dl_type is wildcarded, then L3 fields nw_src, nw_dst, and nw_proto must also be wildcarded. Similarly, if dl_type or nw_proto (the L3 protocol type) is wildcarded, so must be tp_dst and tp_src, which are L4 fields.
Using nx_match
There are multiple ways to use nx_match in POX. The most straightforward interface is that it looks a bit like a Python list, containing (for example), append() and insert() methods which can be used to add individual entries.
1 2 | m = nx.nx_match()
m.append( nx.NXM_OF_ETH_SRC(EthAddr("b8:fe:aa:6e:88:8c")) )
|
To include a mask, specify it as a second argument to the entry constructor:
3 4 | # Only match broadcast/multicast packets
m += nx.NXM_OF_ETH_DST("01:00:00:00:00:00", "01:00:00:00:00:00")
|
Note also in the above example, that we can skip the explicit usage of EthAddr(), and that we can use the += operator as an alternative to append().
In addition to the list-like interface, all the built-in entry types magically have corresponding attributes on the nx_match object. The property name is the name of the entry type, but lower case, and the leading NXM, NXM_NX, etc. prefixes are optional. And, in fact, there are several of these pseudo-attributes. An “un-suffixed” one, and ones with the suffixes “_mask”, “_with_mask”, and “_entry” for the value, the mask, the value+mask (as a tuple), and the actual nxm_entry object itself. For example, line 2 above could also be represented as:
m.eth_src = "b8:fe:aa:6e:88:8c"
And line 4 could be one of the following:
m.eth_dst = "01:00:00:00:00:00"
m.eth_dst_mask = "01:00:00:00:00:00"

# .. or ...

m.eth_dst_with_mask = ("01:00:00:00:00:00", "01:00:00:00:00:00")
Some even have special syntax. For example, IP addresses with CIDR ranges (or CIDR-compatible netmasks) can use the shorthand:
m.of_ip_dst = "192.168.1.0/255.255.255.0"
(Note that you can use arbitrary, non-CIDR-compatible netmasks if you use one of the other forms!)
The nx_flow_mod is, in fact, a subclass of ofp_flow_mod – everything works pretty much the same, except that the match attribute is an nx_match instead of an ofp_match.
The Learn Action
The learn action (nx_action_learn) is another of the powerful Nicira extensions which POX supports. It allows for table entries to add new table entries. A common reason for this is to do MAC learning on the switch without controller involvement (POX comes with an example of exactly this in the form of the forwarding.l2_nx_self_learning component). While the OVS docs/comments are the right place to learn about the learn action in general, we discuss it some here.
As stated above, the learn action causes the generation of a new table entry. There is some current packet (which actually triggered the learn action). This generates a new table entry for future packets. The new table entry is defined by a series of flow_mod_specs which together create a “template” for the new table entry: its match and its actions. Thus, there are two categories of flow_mod_specs: those which specify parts of the new entry’s match, and those which specify actions for the new entry.
The match-oriented flow_mod_specs come in two flavors. The simplest lets you specify a match criteria based on a hard-coded value (i.e., “future packets must have VLAN 100 to match this entry”). The second form uses a value in current packet to specify a match constraint for future packets (i.e., “future packets must have the same VLAN ID as the current packet to match this entry”).
The action-oriented flow_mod_specs come in four flavors. Two of these generate OFPAT_OUTPUT actions on the new entry (which may be a real port number or may be some of the special “virtual” port numbers, e.g., OFPP_FLOOD). The other two types both generate NXAST_REG_LOAD actions (i.e., header rewrites). The difference between the two types of output and rewrite actions is the same as with the two variations of match entries: one uses hard-coded values (“set the VLAN ID to 101” or “output via port 3”), and the other uses a value from the current packet (e.g., “set the VLAN ID to be the same as the one in the current packet” or “output via the port stored in packet metadata register 3”).
All of these variations can be seen as a combination of source and destination. The source is either an immediate value, or its value in the current packet. The destination is either a new match criterion, a field to rewrite, or an output.
POX provides two major ways of specifying flow specs – an explicit and list-oriented interface, and a shorthand method. The following three examples are equivalent ways of creating a simple learning switch:
1 2 3 4 5 6 7 8 9 10 11 12 13 14 15 16 17 18 19 20 21 22 23 24 | # Straightforward. List with flow_mod_spec constructor:
learn = nx.nx_action_learn(table_id=1,hard_timeout=10)
learn.spec = [
nx.flow_mod_spec(src=nx.nx_learn_src_field(nx.NXM_OF_VLAN_TCI),
n_bits=12),
nx.flow_mod_spec(src=nx.nx_learn_src_field(nx.NXM_OF_ETH_SRC),
dst=nx.nx_learn_dst_match(nx.NXM_OF_ETH_DST)),
nx.flow_mod_spec(src=nx.nx_learn_src_field(nx.NXM_OF_IN_PORT),
dst=nx.nx_learn_dst_output())
]
# Appending to list with flow_mod_spec factory:
learn = nx.nx_action_learn(table_id=1,hard_timeout=10)
fms = nx.flow_mod_spec.new # Just abbreviating this
learn.spec.append(fms( field=nx.NXM_OF_VLAN_TCI, n_bits=12 ))
learn.spec.append(fms( field=nx.NXM_OF_ETH_SRC, match=nx.NXM_OF_ETH_DST ))
learn.spec.append(fms( field=nx.NXM_OF_IN_PORT, output=True ))
# Shorthand flow_mod_spec chaining API:
learn = nx.nx_action_learn(table_id=1,hard_timeout=10)
learn.spec.chain(
field=nx.NXM_OF_VLAN_TCI, n_bits=12).chain(
field=nx.NXM_OF_ETH_SRC, match=nx.NXM_OF_ETH_DST).chain(
field=nx.NXM_OF_IN_PORT, output=True)
|
There are some things to note in the above examples:
First, notice that fields are specified using their “NXM” entries (as described in the Nicira Extended Match section above).
Second, notice that we need not use the entire field – you can see that we specify n_bits to limit VLAN matching to 12 bits (since VLAN IDs are in fact only 12 bits of the VLAN TCI). We can also specify a bit offset (as “ofs”); this wasn’t necessary in the above case since it defaults to zero, and the VLAN ID starts at bit zero (had we wanted to match the VLAN priority, we’d have specified ofs=13 and n_bits=3).
Third, notice that while the first example is very explicit about the source and destination (in the sense mentioned just above), this is implicit in the other two. The other two use keyword parameters based on the names of the various flow spec types: “field” and “immediate” specify the source, and “match”, “load”, or “output” specify the destination.
Fourth and lastly, notice that we can skip a “match” when it’s the same as the “field”. This is just a little programmer-optimization for a pretty common case since we often want to match on values in the current packet, as with the VLAN ID.
Additional Information
We should add more documentation about using Nicira extensions. For the moment, you might find the following to be useful references:
- The forwarding.l2_nx and forwarding.l2_nx_self_learning POX components.
- Open vSwitch’s nicira-ext.h. It has a lot of comments, and a lot of it applies to POX’s implementation as well.
- The source code to POX’s openflow/nicira.py. It has some helpful comments.
About the OpenFlow Component’s Initialization
POX was significantly inspired by NOX, and NOX was unquestionably an OpenFlow controller. Additionally, early versions of POX did not have any sort of dependency system. These two factors led to POX having a special case: the OpenFlow component was enabled by default. Later, the –no-openflow switch was added to disable OpenFlow when it wasn’t needed or desired. As time has gone on, usage of this switch has gone from useful on rare occasion to not entirely uncommon and it started to seem like an ugly annoyance. However, simply not starting the OpenFlow component by default didn’t seem like a good idea either: it would break many “known” commandlines, would be more typing for the still-very-common case where it’s desired, and would likely cause many ugly startup exceptions until a fair amount of code was tweaked (since many components – even ones which use the dependency mechanism for other components – assume that the openflow component is always available).
There are a number of possible solutions to this problem and no permanent solution has yet been set in stone. The currently favored high-level approach is to auto-load OpenFlow on demand. A generic demand-loading mechanism was mostly written, but has not been merged. Instead, the current solution in the dart branch (committed on October 13, 2013) has a number of changes specific to the OpenFlow component which attempt to detect whether the OpenFlow component is being used, and load it on demand if so. The detection is not 100%: depending on how they’re written, some older components will not trigger it, and thus will need the openflow component explicitly placed on the commandline. Such components should be tweaked; ideally, they should use the dependency mechanism. (l3_learning, for example, was modified to trigger autoloading.)
OVSDB in POX
Warning
Under Construction: Official but experimental OVSDB support is appearing in POX. The code is in an early state, and so is this section. If you’re interested in OVSDB in POX and want help, you probably want to turn to the pox-dev mailing list for now.
Open vSwitch is software switch that can be controller via OpenFlow and is common in in virtual server environments and even as an element of hardware switches. While the forwarding behavior can be controlled by OpenFlow, OVS has many other aspects which are outside the scope of OpenFlow. The configuration and state for these are held in the Open vSwitch Database (the OVSDB), which can be queried and manipulated via the JSON-based OVSDB protocol.
POX has support for the OVSDB protocol, which allows one to connect to, configure, and query OVS instances. There is both an object-oriented API, and a Python-embedded domain specific language for doing this. The former is somewhat awkward to use – the expectation is that the latter (which is implemented using the former) will be the primary mode of usage, it is the focus of this section.
The POX OVSDB DSL is a fairly straightforward transliteration of the low-level OVSDB wire protocol. There are two major implications here. First, it’s all fairly low level. the DSL is not mean to abstractly model the internals and abilities of OVS – it’s just meant to let you communicate with it. If you want to implement an abstraction, you can do so atop the DSL (and then share your code with the mailing list!). Secondly, this documentation is not meant to be stand-alone. Since the DSL is fairly low level, it maps very closely to the protocol itself, and documenting the protocol in detail here would be redundant. You should read this section along with The Open vSwitch Database Management Protocol documentation (RFC 7047).
Below are listed valid POX OVSDB DSL statements. They look vaguely like SQL (no huge surprise). While we show them here with spaces between words, when writing in Python, words are actually separated by pipe symbols. For example: SELECT|"colname"|FROM|"tablename".
Transactions
Todo
Unfinished
Getting data with SELECT
SELECT [<columns>] FROM <table> WHERE <condition> [AND <condition> ...]
columns can be a list/tuple of columns, or a list of columns separated by AND.
Modifying data: INSERT, UPDATE, DELETE, and MUTATE
INSERT <row> INTO <table> [WITH UUID_NAME <uuid-name>]
UPDATE <table> [WHERE <conditions>] WITH <row>
DELETE [IN|FROM] <table> [WHERE <conditions>]
or
DELETE [WHERE <conditions>] IN|FROM <table>
IN <table> [WHERE <conditions>] MUTATE <mutations>

  mutations is an AND-separated list of one of:

  <column> INCREMENT/DECREMENT/MULTIPLYBY/DIVIDEBY/REMAINDEROF <value>
DELETE <value> FROM <column>
INSERT <value> INTO <column>
Waiting for conditions and monitoring changes with WAIT and MONITOR
WAIT UNTIL/WHILE <columns> [WHERE <conditions>] IN <table> ARE|IS [NOT] <rows> [[WITH] TIMEOUT <timeout>]
columns is a list/tuple or AND-separated list of column names
rows in AND-separated list of rows
MONITOR [<columns>] IN <table> [FOR [INITIAL] [INSERT] [DELETE] [MODIFY]]
Third-Party Tools, Tutorials, Etc.
This section attempts to note some projects which use POX but are not part of POX itself. (This may get moved to its own page or something in the future.)
POXDesk: A POX Web GUI
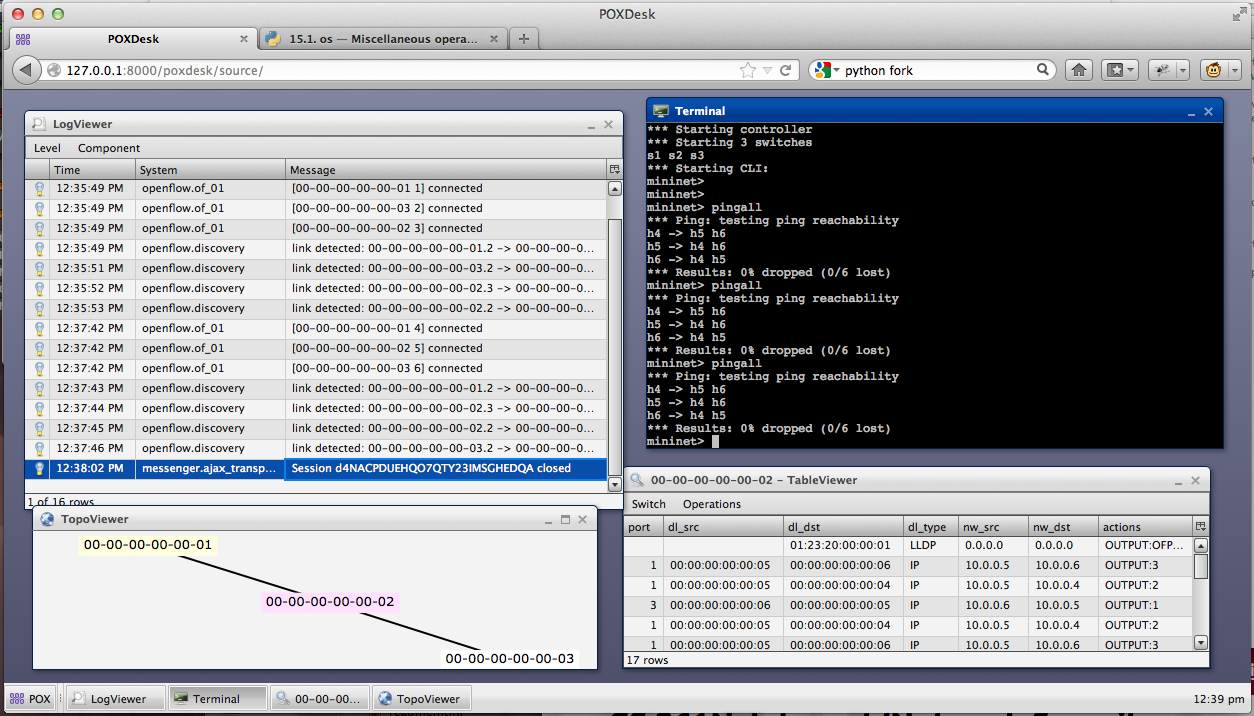
This is a side-project of Murphy’s in a very early state. It provides a number of features: a flow table inspector, a log viewer, a simple topology viewer, a terminal, an L2 learning switch implemented in JavaScript, etc. It’s meant to be extensible. It’s implemented using the Qooxdoo JavaScript framework on the front end, and POX’s web server and messenger service on the backend.
Site: github.com/MurphyMc/poxdesk/wiki
Blog post with more info and screenshots: www.noxrepo.org/2012/09/pox-web-interfaces/
OpenFlow Tutorial
The OpenFlow Tutorial has a POX version which guides the reader through setting up a test environment using Mininet and implementing a hub and learning switch, among other things.
SDNHub POX Controller Tutorial
SDNHub has a brief tutorial on POX which includes their own VM with POX and Mininet preinstalled.
OpenFlow Switch Tutorial
These are examinations of some different ways to write “switch” type applications in OpenFlow with POX. Prepared by William Emmanuel Yu.
- OpenFlow Switch Tutorial (of_sw_tutorial.py) - this is a simple OpenFlow module with various switch implementations. The following implementations are present:
- Dumb Hub - in this implementation, all packets are sent to the controller and then broadcast to all ports. No flows are installed.
- Pair Hub - Flows are installed for source and destination MAC address pairs that instruct packets to be broadcast.
- Lazy Hub - A single flow is installed to broadcast packet to all ports for any packet.
- Bad Switch - Here flows are installed only based on destination MAC addresses. Find out what the problem is!
- Pair Switch - Simple to a pair hub in that it installs flows based on source and destination MAC addresses but it forwards packets to the appropriate port instead of doing a broadcast.
- Ideal Pair Switch - Improvement of the above switch where both to source and to destination MAC address flows are installed. Why is this an improvement from the above switch?
- OpenFlow Switch Interactive Tutorial (of_sw_tutorial_oo.py) - this is the same module above that is Interactive. If run with a pox py command line. Users can dynamically load and unload various switch implementations. Note: To use the interactive features, you will also need to include the “py” component on your commandline.
POX> INFO:openflow.of_01:[00-00-00-00-00-01 1] connected
POX> MySwitch.list_available_listeners()
INFO:samples.of_sw_tutorial_oo:SW_BADSWITCH
INFO:samples.of_sw_tutorial_oo:SW_LAZYHUB
INFO:samples.of_sw_tutorial_oo:SW_PAIRSWITCH
INFO:samples.of_sw_tutorial_oo:SW_IDEALPAIRSWITCH
INFO:samples.of_sw_tutorial_oo:SW_DUMBHUB
INFO:samples.of_sw_tutorial_oo:SW_PAIRHUB
POX> MySwitch.clear_all_flows()
DEBUG:samples.of_sw_tutorial_oo:Clearing all flows from 00-00-00-00-00-01.
POX> MySwitch.detach_packetin_listener()
DEBUG:samples.of_sw_tutorial_oo:Detaching switch SW_IDEALPAIRSWITCH.
POX> MySwitch.attach_packetin_listener('SW_LAZYHUB')
DEBUG:samples.of_sw_tutorial_oo:Attach switch SW_LAZYHUB.
POX> MySwitch.clear_all_flows()
DEBUG:samples.of_sw_tutorial_oo:Clearing all flows from 00-00-00-00-00-01.
POX> MySwitch.detach_packetin_listener()
DEBUG:samples.of_sw_tutorial_oo:Detaching switch SW_LAZYHUB.
POX> MySwitch.attach_packetin_listener('SW_BADSWITCH')
DEBUG:samples.of_sw_tutorial_oo:Attach switch SW_BADSWITCH.
- OpenFlow Switch Tutorial for Betta (and beyond) (of_sw_tutorial_resend.py) - this is the same module as above but takes advantage of resend functionality in the betta branch.
Statistics Collector Example
Prepared by William Emmanuel Yu.
- Statistics Collector Example (flow_stats.py) - this module collects statistics every 5 seconds using a timer. There are three (3) kinds of statistics collected: port statistics, flow statistics and a sample displaying on web statistics (similar to an example above). Requires at least the betta version of POX.
RipL: Datacenter Topologies with POX and Mininet
RipL (Ripcord-Lite) is a Python library by Brandon Heller to facilitate working with datacenter-like networking stuff. In particular, it makes it really easy to run a “fat tree” topology in Mininet.
RipL-POX builds on RipL, creating an OpenFlow controller for static RipL topologies. It can route along a simple spanning tree, or it can utilize multiple paths either at random or based on a hash, and it can do these things either proactively or reactively (or as a hybrid).
Murphy has recently (spring 2014) updated RipL-POX to work on recent versions of POX (the current head of the dart branch). As of this writing, his changes haven’t been merged upstream, but are available in his own git repository. Unfortunately, RipL itself (not RipL-POX) seems to have some incompatibility with current versions of Mininet which prevents the proactive mode of RipL-POX from working. Murphy has some brief notes on how he cobbled together a working version of Mininet/RipL for testing in a pull request on the main RipL-POX repository.
The RipL and RipL-POX repositories have README and INSTALL documents useful for getting going. Feel free to ask questions in the usual places for additional assistance.
Main RipL repository: github.com/brandonheller/ripl
Main RipL-POX repository: github.com/brandonheller/riplpox
Murphy’s updated RipL-POX repository: github.com/MurphyMc/riplpox
Direct Server Return Load Balancer
David A Dunn has made available a component which does load balancing for VIP traffic utilizing DSR with other traffic being handled by the “NORMAL” action.
Coding Conventions
The Style Guide for Python Code (AKA PEP 8) outlines some conventions for developing in Python. It’s a good baseline, though POX does not aim for strict conformance. Here are some guidelines for writing code in POX, especially if you’d like to have it merged. Note that in some cases they are in addition to or differ from PEP 8. Also note that the most important guideline is that code is readable. Also also note that the code in the repository does not entirely conform with the below guidelines (pull requests that improve consistency are very welcome!).
- Two spaces for indentation
- Line wrapping / line length:
- Maximum of 79 characters, though 80 won’t kill us.
- Use implicit line joining (e.g. “hanging” parentheses or brackets) rather than the explicit backslash line-continuation character unless the former is very awkward
- Continue lines beneath the appropriate brace/parenthesis (Lisp style) when that works well. When it doesn’t, my preference is to indent a single space, though I know that drives a lot of Python coders crazy, so I’m hesitant to set a specific rule here as long as it’s clear. The basic rule is that it should be either more or less indentation than usual – i.e., don’t use two spaces for a continued line. I am more and more using four spaces.
- Two blank lines separate top-level pieces of code with structural significance (classes, top level functions, etc.). You can use three for separating larger pieces of code (though when one is tempted to do this, it’s always a good idea to ask oneself if the two larger pieces of code should be in separate files). Methods within a class should be one or two, but should be consistent within the particular class.
- Put a space between function name and opening parenthesis of parameter list. Similar for class and superclass. That is: “
def foo (bar):”, not “def foo(bar):”. - Use only new-style classes. (This means inherit from object.)
- Docstrings:
- Either stick to
""" one line """, or have the opening and closing"""on lines by themselves. (The latter is preferred.)- The first line should always be a relatively short, standalone description. Additional lines should be separated from the first by a blank line.
- Naming
- Classes should generally be InitialCapped.
- Methods and other attributes should be lower_with_underscores. Note that this is currently violated all over the place (though it’s getting better).
- “Private” members (which you explicitly don’t want others relying on) should start with an underscore.
- “constants” should be UPPER_WITH_UNDERSCORES.
- The keyword arguments catch-all variable is called kw (against Python convention of
kwargs)
Additionally, if you want to get your commits merged, please follow good commit message practice. For a quick writeup on the subject, see this blog post. In addition, it’s nice if the first part of the first line roughly indicates which portion/subsystem the commit relates to when possible, e.g., “openflow” or “forwarding”. For example, libopenflow: Fix ofp_match lock/unlock. See the existing commit log on github for many examples.
FAQs
What versions of OpenFlow does POX support?
POX currently supports OpenFlow 1.0. It also supports a number of the Nicira / Open vSwitch (“nx”) extensions (many of which are the basis for features in later OpenFlow versions).
Search the mailing list for a partial port to OpenFlow 1.1.
We’ll probably get around to supporting later versions eventually, or would be happy to work with others on getting patches mainlined. Come to the mailing list and raise the subject if you’re interested.
What does the Fields ignored due to unspecified prerequisites warning mean?
See the next question.
I tried to install a table entry but got a different one. Why?
This question also presents itself as “What does the Fields ignored due to unspecified prerequisites warning mean?”
Basically this means that you specified some higher-layer field without specifying the corresponding lower-layer fields also. For example, you may have tried to create a match in which you specified only tp_dst=80, intending to capture HTTP traffic. You can’t do this. To match TCP port 80, you must also specify that you intend to match TCP (nw_proto=6). And in order to match on TCP, you must also match on IP (dl_type=0x800).
For more information, see the text on “normal form” flow descriptions in the ovs-ofctl man page, or the new clarifying text added to section 3.4 in the OpenFlow 1.0.1 specification.
What is a “datapath”? What is a DPID?
More or less, a datapath is a logical OpenFlow switch. A physical “OpenFlow switch” – meaning a box with ethernet ports – may have more than one datapath (though usually won’t).
A DPID is a datapath identifier, and is part of the OpenFlow specification, though the OpenFlow specification calls it a datapath_id, and is pretty vague about it in general. Basically, it is a unique identifier for a switch so that someone/something (e.g., an OpenFlow controller) can uniquely identify the switch. During the initial handshake, a switch sends its DPID to the controller as part of the ofp_switch_features message.
A DPID is 64 bits. The spec claims the lower 48 bits are intended to be the switch’s ethernet address. This statement has always been a bit confusing – traditionally, a switch isn’t an endpoint, so what addresses does a switch even really have? The only answer that makes sense to this author is that it’s the ethernet address associated with the IP address used for the OpenFlow control channel. But in implementations, this is not always true because the OpenFlow control channel often may originate from one of several interfaces and it’ll use whatever ethernet address goes with it.
In practice, its pretty arbitrary, and often user-configurable independent of any ethernet address. It’s probably a decent idea to always just treat it as an opaque value which should be unique. If a vendor happens to base it on some particular ethernet address, treat that as an implementation detail for how they achieve uniqueness and not as there being any sort of real relationship between the two.
To give a more concrete answer: with Open vSwitch, it defaults to the ethernet address of the switch’s “local” port with the top 16 bits zeroed (this ethernet address being generated at random when last I checked). With Mininet, this generally gets overridden to match the number of the Mininet switch.
See the first few sections of the “OpenFlow in POX” section of this manual for more.
How do I create a firewall / block TCP ports?
An easy way to do this is to use a forwarding component which does fine-grained flows (e.g., l2_learning), and then intercept the PacketIn events. When you see a packet you want to block, kill the event. This will keep l2_learning from seeing the event and installing a flow for it. The mac_blocker component pretty much works like this. Here’s a simple example for blocking arbitrary TCP ports:
"""
Block TCP ports

Save as ext/blocker.py and run along with l2_learning.

You can specify ports to block on the commandline:
./pox.py forwarding.l2_learning blocker --ports=80,8888,8000

Alternatively, if you run with the "py" component, you can use the CLI:
./pox.py forwarding.l2_learning blocker py
 ...
POX> block(80, 8888, 8000)
"""

from pox.core import core

# A set of ports to block
block_ports = set()

def block_handler (event):
  # Handles packet events and kills the ones with a blocked port number

  tcpp = event.parsed.find('tcp')
  if not tcpp: return # Not TCP
  if tcpp.srcport in block_ports or tcpp.dstport in block_ports:
    # Halt the event, stopping l2_learning from seeing it
    # (and installing a table entry for it)
    core.getLogger("blocker").debug("Blocked TCP %s <-> %s",
                                    tcpp.srcport, tcpp.dstport)
    event.halt = True

def unblock (*ports):
  block_ports.difference_update(ports)

def block (*ports):
  block_ports.update(ports)

def launch (ports = ''):

  # Add ports from commandline to list of ports to block
  block_ports.update(int(x) for x in ports.replace(",", " ").split())

  # Add functions to Interactive so when you run POX with py, you
  # can easily add/remove ports to block.
  core.Interactive.variables['block'] = block
  core.Interactive.variables['unblock'] = unblock

  # Listen to packet events
  core.openflow.addListenerByName("PacketIn", block_handler)
How can I change the OpenFlow port from 6633?
If you turn on verbose logging, you’ll see that it’s the openflow.of_01 module which listens for connections. That’s the hint: it’s this component that you need to reconfigure. Do so by passing a “port” argument to this component on the commandline:
./pox.py openflow.of_01 --port=1234 <other commandline arguments>
How can I have some components start automatically every time I run POX?
The short answer is that there’s no supported way for doing this. However, it’s pretty simple to just create a small component that launches whatever other components you want.
For example, let’s say you were tired of always having to remember the following commandline:
./pox.py log.level --DEBUG samples.pretty_log openflow.keepalive --interval=15 forwarding.l2_pairs
By writing a simple component, you can replace with above with simply:
./pox.py startup
The code for the simple component should be placed in ext/startup.py and would contain the following code:
# Put me in ext/startup.py

def launch ():
  from pox.log.level import launch
  launch(DEBUG=True)

  from pox.samples.pretty_log import launch
  launch()

  from pox.openflow.keepalive import launch
  launch(interval=15) # 15 seconds

  from pox.forwarding.l2_pairs import launch
  launch()
Note
Note that here, as elsewhere in POX, it’s important to import POX modules using their full name – including the leading “pox” package. Not doing so can lead to confusing and incorrect behavior.
How do I get switches to send complete packet payloads to the controller?
By default, when a packet misses all the entries in the flow table, only the first X bytes of the packet are sent to the controller. In POX, this defaults to OFP_DEFAULT_MISS_SEND_LEN, which is 128. This is probably enough for, e.g., ethernet, IP, and TCP headers... but probably not enough for complete packets. If you want to inspect complete packet payloads, you have two options:
- Install a table entry. If you install a table entry with a
packet_outtoOFPP_CONTROLLER, POX will have the switch send the complete packet by default (you can manually set some smaller number of bytes if you want).- Change the miss send length. If you set
core.openflow.miss_send_lenduring startup (before any switches connect), switches should send that many bytes when a packet misses the whole table. Check theinfo.packet_dumpandmisc.full_payloadcomponents for examples.
How can I communicate between components?
Components are just Python packages and modules, so one way you can do this is the same way you communicate between any Python modules – import one of them and access its top-level variables and functions.
POX also has an alternate mechanism, which is described more in the section Working with POX: The POX Core object.
How can I use POX with Mininet?
Use the remote controller type. For example, if you are running POX on the same machine as Mininet:
mn --topo=linear --mac --controller=remote
(The --mac option is optional, but can make debugging easier.)
A common configuration is to run Mininet in a virtual machine and run POX in your host environment. In this case, point Mininet at an IP address of the host environment. If you’re using VirtualBox and a “Host-only Adapter”, this is the address assigned to the VirtualBox virtual adapter (e.g., vboxnet0). You do this slightly differently if you’re using Mininet 1 or Mininet 2. For Mininet 1:
mn --topo=linear --mac --controller=remote --ip=192.168.56.1
For Mininet 2:
mn --topo=linear --mac --controller=remote,ip=192.168.56.1
Additionally, in Mininet 2, you may want to specify the --nolistenport option.
I’m seeing many packet_in messages and forwarding isn’t working; what gives?
This problem is often seen when attempting to use one of the “learning” forwarding components (l2_learning, l2_multi, etc.) on a mesh or other topology with a loop. These forwarding components do not take into account the adjustments that are required to work on loopy topologies.
The spanning_tree component is meant to be a fairly generic solution to this problem, so you might try running it as well. It can also be helpful to prevent broadcasts until discovery has had time to discover the entire topology. Some components (such as l2_learning) have an option to enforce this.
Does POX support topologies with loops?
Let’s start with making it clear that this is a broken question because POX itself simply doesn’t care. The real question is “Do any of the forwarding components that come with POX support topologies with loops?” The answer is ... sort of! As far as I remember, none of them explicitly support loops. However, several of them are compatible with the openflow.spanning_tree component. openflow.spanning_tree disables flooding on ports, leaving only a tree. For forwarding components which only loop during floods, don’t change the port flood bit, and work with the discovery component, this may be good enough.
See the section on the openflow.spanning_tree component and the above FAQ question for more.
Switches keep disconnecting (especially with Pantou/reference switch). Help?
The short answer is that you should run the openflow.keepalive component too. See the description of this component above for more information.
Why doesn’t the openflow.webservice component work?
If you’re sending requests to the openflow.webservice component and it’s not sending back replies, this chances are that you’re not conforming to the JSON-RPC spec. Specifically, you’re not including an “id” key in your request. Add one and set it to an integer and see if that helps. See the openflow.webservice examples in this manual for additional information.
What are these log messages from the packet subsystem?
You may see info level log messages from the packet subsystem like:
(dhcp parse) warning DHCP packet data too short to parse header
(udp parse) warning UDP packet data too short to parse header: data len X
(icmp parse) warning ICMP packet data too short
These aren’t errors or necessarily indicative of any problem.
When OpenFlow switches send packets to the controller, they often do not send the entire packet. When the packet is sent to the controller via an output action to the OFPP_CONTROLLER port, the output action can contain the number of bytes to send. When a packet is sent to the controller due to a table miss, this length can be set via OFPT_SET_CONFIG, but often defaults to 128 bytes.
When the switch only sends a partial packet, POX’s packet library may well not be able to parse the entire packet since the entire packet isn’t actually there. The decision was made to log this message at info level instead of debug level because debug messages within non-component portions of POX are intended to help debug POX itself, and the condition leading to these isn’t indicative of bugs in POX. It’s possible that we should bend the rules here and log them at debug level anyway; feel free to register your opinion on noxrepo.org (in the forum or pox-dev mailing list).
Some things you can do about this:
- Ignore it unless it’s actually causing a problem for you (because your application requires these packets to be parsed correctly).
- Turn the packet subsystem’s log level to warning (
log.level --packet=WARN).- Install a flow to send the entirety of relevant packets to the controller (an ofp_action_output to OFPP_CONTROLLER will default to doing this).
- Tell the switch to send complete packets to the controller on table misses (an easy way is to simply invoke the
misc.full_payloadcomponent).
I Installed IP-Based Table Entries But Ping/TCP Doesn’t Work. Why not?
To answer your question with a question: are you handling ARP?
Does POX support Python 3?
Not yet.
At this point, Python 2 is still pretty much the standard. Additionally, it’s quite common to run POX using the PyPy interpreter, which does not yet support Python 3. In particular, we don’t have much desire to support both Python 2 and 3 simultaneously. So we expect to someday support Python 3, but not until it seems like it’s what the majority of users want, and probably not until after PyPy does.
If Python 3 support is important to you now, you should start an issue on the github tracker or post about it on pox-dev. Especially if you’re willing to do some of the work, we’ll be happy to discuss getting this done, how we can help, and how we can get your work merged into the main repository.
(This question hasn’t actually been asked a single time, much less frequently, as its inclusion in a FAQ would imply. I just wanted to document the answer.)
I’d like to contribute. Can I? Do you have project ideas?
Sure you can. Some thoughts:
- Read the Coding Conventions section of the manual
- Join the pox-dev mailing list at noxrepo.org
- Get a github account and fork the POX repository
- Submit pull requests on github or formatted patches on pox-dev
If you’re looking for project ideas:
- Check POX’s issue tracker on github
- Ask the mailing list – in particular, Murphy has started maintaining a list of projects suitable for students or interested parties and may be able to give you a suggestion
What’s this warning like “core:Still waiting on 1 component(s)”?
A dependency of some component you’re running hasn’t been met. To rectify this, you should probably run the missing component by including it on the commandline. If you run with logging at DEBUG level, you’ll get a more detailed message, such as “core:startup() in pox.forwarding.l2_multi still waiting for: openflow_discovery”. In this case, it indicates that forwarding.l2_multi requires openflow.discovery.
Why doesn’t POX’s discovery use the normal LLDP MAC address?
POX’s discovery uses the MAC address that Nicira defined for use with OpenFlow-based discovery and which was used by the NOX controller. The significant difference between the normal one and the Nicira one is that the original one is in the bridge-filtered range, which means that Ethernet switches should never forward it. If your network is entirely made of OpenFlow switches, this doesn’t make any difference. But if your network is a combination of OpenFlow switches and traditional Ethernet switches, it does.
Imagine you had the following topology, where A and B are OpenFlow switches, and S is a standard Ethernet switch.
A -- S -- B
Imagine that the controller tells A to send a discovery packet with the normal LLDP MAC address. It gets to S. S will drop it, since the address is bridge-filtered. Thus, the controller concludes that packets sent from A will not reach B. This is obviously false except in the very special (that is, unusual) case where you’re using bridge-filtered MAC addresses!
By using a non-bridge-filtered address for discovery, POX (and NOX before it) can “see through” traditional Ethernet switches.
What’s a good strategy for debugging a problem with my POX-based controller?
The Open vSwitch FAQ has a really good entry on this subject:
Q: I have a sophisticated network setup involving Open vSwitch, VMs or multiple hosts, and other components. The behavior isn’t what I expect. Help!
A: To debug network behavior problems, trace the path of a packet, hop-by-hop, from its origin in one host to a remote host. If that’s correct, then trace the path of the response packet back to the origin. Usually a simple ICMP echo request and reply (“ping”) packet is good enough. Start by initiating an ongoing “ping” from the origin host to a remote host. If you are tracking down a connectivity problem, the “ping” will not display any successful output, but packets are still being sent. (In this case the packets being sent are likely ARP rather than ICMP.)
The entry then goes on in further detail, including information on some of the tools available to you. While they are Open vSwitch-centric, a lot of it applies (perhaps in slightly altered form) to debugging SDN programs in general.
I’ve got a problem / bug! Can you help me?
Possibly. There are a number of things you can do to help yourself, though. If none of those work or apply, there are a number of things you can do to help us help you. Here are some things you might try:
- Read the logs. If the logs don’t seem to say anything useful, try reading them at a lower log level, such as the DEBUG level. That way, you’ll get all the log messages. Do this by adding
log.level --DEBUGto your commandline. See thelog.levelcomponent section for more info on adjusting log levels. In particular, pay attention for warnings or errors (e.g., see the “Still waiting on...” FAQ entry)! - Look at the OpenFlow traffic. If you don’t seem to be getting an event that you think you should be, or you think you’re sending messages but the switch doesn’t seem to be responding to, or anything else where you think there’s a breakdown in communication between a switch and POX, it can be helpful to look at what actually got put on the wire. There is an OpenFlow dissector for Wireshark (you can Google for it). You can either run it as usual, or you can use POX’s
openflow.debugcomponent to generate synthetic traces which show exactly what POX thinks it saw – one message per synthetic “packet” (which makes the Wireshark list easier to read). - Run a newer version. Particularly, if you are running a release branch, you might think about running the active branch instead. While active branches may contain new problems, they also fix old ones! See the “Selecting a Branch / Version” section for more information.
- Check the other FAQs. Your question may already be answered!
- Search the mailing list archive. This would be more helpful if it weren’t so flaky. Sorry about that, hopefully we’ll get around to fixing it before too long!
If none of those work, you might try posting to the pox-dev mailing list (sign up at www.noxrepo.org/community/mailing-lists). When you do, you’ll probably get better results the more you can do the following:
- Post the commandline with which you invoked POX.
- Post the POX log. It’s probably a good idea to post them at DEBUG level. Even if you didn’t see anything in the log, it may be helpful to someone else. The first part of the log (before the Up message) is especially useful, as it tells which operating system and Python interpreter you are running, and many components announce themselves. If you don’t post this, you might at least try to include some of this information yourself.
- Post the traceback. This sort of goes with the prior entry, but it’s worth making specific note. If you get an exception, post the full text of the exception including the traceback if possible.
- Post which version of POX you are using. Did you just do a
git clone http://github.org/noxrepo/pox, or did you switch branches? Did you do this recently or are you potentially using an older version? - Post what kind of switches you are using. Are you running POX with Mininet? Which version? What commandline did you use to invoke Mininet? If it’s custom, consider posting your Mininet topology or script. If you’re running with hardware switches, what kind? If you’re running with a software switch, which one and which version?
- Post code which illustrates the problem. A minimal example is great, but anything is better than nothing.
- Post a trace of the controller-switch OpenFlow traffic. This is data you should have collected yourself as part of step 2 of the previous list. Capture the traffic with Wireshark or the
openflow.debugcomponent and post it to the list. - Post what you’ve tried already. Hopefully you’ve tried to address the issue yourself. What have you tried and what were the results?
Doing the above makes it easier for people to help you, and also potentially saves time – if you don’t do the things mentioned above, it’s quite possible that the first suggestions you get from the mailing list will be to try the things mentioned above!
Note
If you’re new to mailing lists and asking questions online, you may find some General Mailing List Tips useful. [1]
| [1] | In general, the POX mailing list is polite and friendly and useful and other good things, and it has not suffered the negativity/flaming/etc. that people sometimes associate with mailing lists (usually larger ones). That said, if you’re new to mailing lists, it’s still not a bad idea to read a bit about mailing list etiquette and how to ask questions on a mailing list. This is not necessarily because it’ll help you avoid rudeness or anything, but because it will make more people want to help you (which is good for you), and it will allow the ones that do to get you the answers you want faster (which is good for everyone). Eric S. Raymond, who wrote The Cathedral and the Bazaar: Musings on Linux and Open Source by an Accidental Revolutionary (along with NetHack and some other good stuff), has written up a guide on How To Ask Questions The Smart Way (on mailing lists). In particular, the “Be precise and informative about your problem”, “Describe the goal, not the step”, and “When asking about code” sections are good reading. While it has nothing to do with POX at all, the Apache Jena project has a much shorter but still good guide on How to ask a good question. |